
It always fun to bake in a group, even if the group is a virtual one ! Its inspiring and you feel good about being in the company of some fantastic bakers and more importantly, people who like baking.
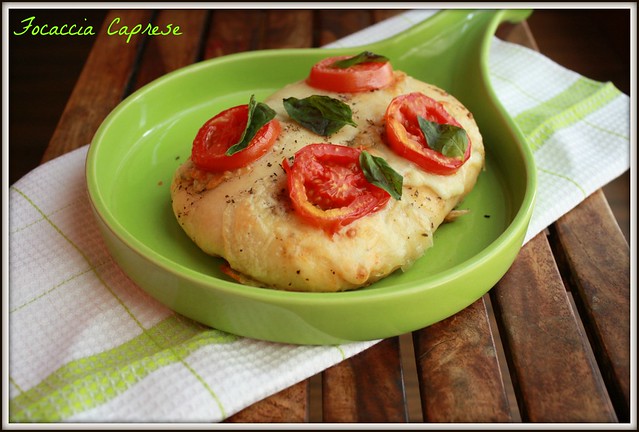
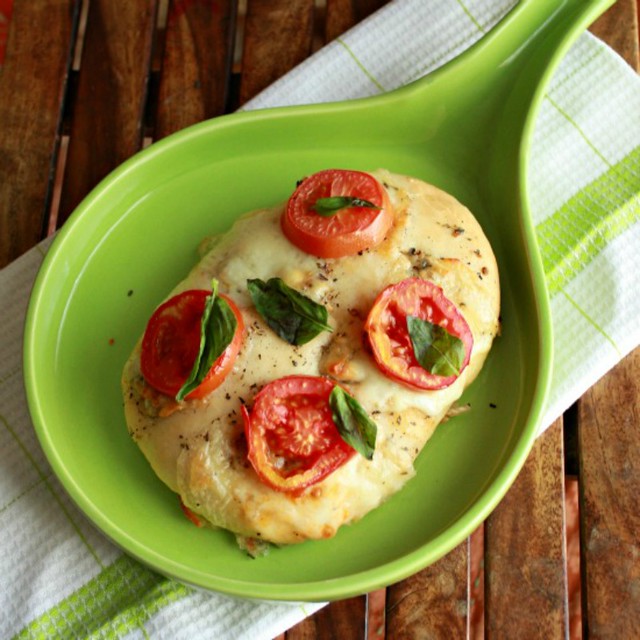
Aparna gives us a recipe each month and this time its Focaccia Caprese. This needed Mozzarella and fresh tomatoes. Here in Ahmedabad, the dairy products are really good, not surprising considering Amul is about an hour away from here! There is this other place called 'Jain Dairy', which has amazing dairy products. I got the mozzarella from there and it was fantastic !
Bread baking can be simpler than the regular Indian cooking, once you get the hang of the yeast beast. Thankfully, I've had a pretty good working relation with the yeast and so we get along just fine. What's made life easier is that I discovered instant yeast, thanks to Sayantani and Suma. Its a dream to work with, no worries about the proofing, just a fairly sunny day and you're set ! I've even tried it on a gloomy rainy day and it still worked fine.
This focaccia has this really aromatic herbed oil which gives it a great flavour, along with mozzarella and fresh tomatoes. Its a great recipe and it you are yet to begin baking with yeast, this is a great start. Focaccia is the easiest of breads and tastes great.
I baked mine for a minute or two more to allow the cheese to melt a little more. The one with the slightly melted cheese got chomped in minutes and I had no time to click the pictures. This one was made to my son's taste, who didn't want to see so much cheese!
This is being Yeastspotted !
Focaccia Caprese
Recipe Source : Aparna of My Diverse Kitchen, adapted from The Kitchen Whisperer
What you need -
For the dough :
2 tsp instant yeast
1.5 tbsp sugar
3.5 cups maida (I did not have vital gluten, used plain flour)
1 tsp salt
1/4 cup olive oil
1 to 1 1/2 cups warm water
A little more olive oil for brushing dough
For the Topping:
4 large tomatoes sliced
1 small round of fresh mozzarella
a few fresh basil leaves
For the Herbed Oil:
1/4 cup olive oil
1 tsp dried oregano
1 tsp dried basil
1/2 tsp red chilli flakes
1 tsp finely minced garlic/ paste
Salt to taste
Fresh basil leaves for garnishing
What you do with it -
To make the herbed oil, add all the ingredients listed under herbed oil and whisk well. Set it aside.
In a large bowl, add the yeast, sugar, flour, salt and oil. Combine and add 1 cup of warm water and knead until you have a soft elastic dough. I knead it on my kitchen platform (thats been scrubbed clean). Its much easier this way for me.
Grease a bowl with a little olive oil and place the dough in it. I tend to apply a little oil over the top of the dough too. Then cover the top of the bowl with a cling wrap. From my experience with breads so far, this works better than covering it with a thin cloth. Allow it to rise in a warm place. This could take between 40 mins to an hour
Once the dough has risen, divide it into 2,3 or 4 parts, depending on what size you want. If you are not using it all, wrap the unused dough in cling film and refrigerate it. Bring it to room temperature and then proceed. I used this dough to make 3 medium sized focaccia. I made 2 first, refrigerated the remaining dough, after the first rise and made the next one a day later. It turned out just as good.
Pre-heat the oven at 200-210 C
Roll out the dough or just use your hands to stretch it to the shape you want, it really doesn't matter. I prefer rectangle or oval. Place the dough in a greased baking tray. Allow it to rise for about 20 mins. the dough gets pretty springy at this stage. Oil your fingers slightly and then make little 'dimples' in the dough, that are fairly well-spaced. Grease the top of the dough with oil
Bake for about 15-20 mins till the sides are golden brown. Take it out of the oven and raise the temp of the oven to about 230 C
Using a spoon, pour the herbed oil over the focaccia and then place slices of mozzarella over it. Top the mozzarella with tomato slices. Bake for another 5-10 mins, till the cheese has melted. Remove from the oven and top with fresh basil leaves
We had this with minestrone soup for dinner and again for breakfast the next day, freshly baked, of course!