Wednesday, March 27, 2013

Vanilla flavoured Thandai

Holi - the festival of colours is here ! After all the crazy fun with colours, its time to cool off with some Thandai - a flavoured milk, with almonds, saffron and spices. This is a popular drink in the northern states of India and this was my first time with thandai. This is a Holi special drink and a little bhang mixed into it can take this thandai to another level !

thandai1

Holi is not something I grew up celebrating. It is not such a popular festival in the South Indian culture, but people have adapted to it now. It was, in fact, quite a menace when we were younger and studying. Strangers would just throw balloons with coloured water or splash coloured paints and I didn't quite understand how that was considered celebration.
I enjoy it when its with family and close friends but definitely not with some arbit strangers

For those of you who do celebrate it, wish you a very Happy Holi. For those of you who dont, this drink is great for summers, Holi or otherwise

I did not have cardamom and khuskhus at home, so substituted it with some vanilla pods for a little twist to the traditional thandai

Thandai

What you need -

1 litre milk, preferably full fat
4 tbsp sugar
8 peppercorns
a few strands of saffron / kesar
20 almonds
2 tsp fennel seeds / saunf
1 vanilla pod

What you do with it -

Soak the almonds in hot water and keep aside for 15 mins
Pour out the milk into a thick bottomed vessel / pan
Allow the milk to boil and then reduce the heat
Slit the vanilla in half and add it to the pan of milk
Add the sugar and mix well till the sugar is dissolved
Powder the peppercorns and fennel seeds
Peel the skin off the almonds and grind along with the powdered peppercorns and fennel
Take the milk off the heat and allow it to cool
Add the almond paste to it and stir in well
Refrigerate this for 3-4 hours or overnight
Take a tbsp of warm milk and add the saffron strands to it
Strain the cooled milk using a sieve and discard the residue
Add the saffron and mix well
Serve cold with gujiyas, kachoris, kanji vada and other Holi delicacies

Monday, March 25, 2013

Fig preserve

Ever since I bought these beautiful figs, I have been scouring my recipe books and the blogosphere for something interesting that i could make with it. I can eat them fresh, love them that way, but wanted to make something with it. By the time I short-listed a few ideas, these delicate figs were already starting to shrivel up a bit.

Baking something with it was a great idea, but again I can sure do without the flour, butter and sugar, so I decided on a simple fig preserve, that way I get to taste them even when they aren't in season any more.

fig preserve
Fig preserve

I didn't realise how simple making a preserve would be. It just took like 5 mins of my time and about 30 mins on the stove, where I really need to do much other than peep in once in a way to check how it was all going.

figs
Fresh figs

Preserves usually use whole fruits and is more chunky and gives you the real flavour of the fruit. This has no pectin and the only added flavour was the cinnamon, which seemed to pair up beautifully with the figs

figs for preserve
Figs ready to get 'preserved'

We have had this fig preserve with some parathas, spread it over bread, used it as a topping on vanilla ice-cream and it works fantastically any way you'd like to use it.

fig preserve2
Fig preserve

I like the chunky bits that come in the preserve and when I was storing this in the jar, I stuck in the piece of cinnamon that I used to cook with the figs. The cinnamon continues to give its wonderful flavour into the preserve. Simple, pectin-free and pretty low on the sugar. This one really worked well for me

Fresh fig preserve

What you need -

10 figs
3 tbsp granulated sugar
1-2 long sticks of cinnamon broken into two
juice of one lemon

What you do with it -

Wash the figs and then cut them in quaters
Place them in a thick bottomed pan
Sprinkle the sugar and lemon juice over it
Throw in the two pieces of cinnamon
Keep it on a low flame for about 25-30 mins
Cover it for the first 10-15 mins, but keep checking on how fast it cooks
There is no need to add water. The lemon juice and sugar work well enough for this
Once the figs start to break up, stir them a bit
If there are very large chunks of figs, break it down gently with a fork and continue cooking it till it all done and there is not much liquid remaining
Sterilise the jar that you will be storing this in
I just put the jar in a large pot of hot water and allow the water to boil for 10 mins
Take the jar out and allow it to dry it in the sun. Ensure that there is no moisture in the jar
Once the fig preserve has cooled down, transfer it to the jar
Store it in the refrigerator

Thursday, March 21, 2013

Orange and Banana muffins (no eggs)

Generally when I am cooking our daily meals, I don't really think too much and almost work on auto-pilot. The vegetables from the fridge, the onions and potatoes from the baskets, the masala powders and the indispensable set of spices. Thanks to my son's early morning school, I can now make rotis at 5.30am, when I am barely even awake.
But when it comes to baking, I am a little more careful, after the few disasters I've had. I prefer to follow a recipe, at least for the measurements, though I still don't have kitchen scales.

orange banana muffins

This time around, I decided to make these muffins with the oranges and the lone banana lying around in the fruit bowl. I like the idea of adding fruit purées and juices in cakes and muffins. They add a lot to the flavour and softness and its fun to try these with different seasonal fruits. Puréed banana with a little baking soda works as a perfect substitute for eggs in muffins

orange muffins500

My friend and her kids were to come over and I had half an hour on hand, so I just grabbed the ingredients and made these real quick, without really referring to any recipe this time. Was really happy with the way they turned out. I guess I have finally the hang of baking without reading thru each line of the recipe every time !
Co-incidentally my friend brought along orange muffins too, hers had some ginger and chocolate grated into it, which was a delicious combination

Egg-free Orange and Banana muffins

What you need-

3/4 cup wheat flour
3/4 cup APF / maida
1/2 cup freshly squeezed orange juice
1 banana
1 tsp baking powder
1 tsp baking soda
1/2 cup sugar (I used powdered sugar this time)
5-6 almonds cut into pieces
1/2 cup butter (Can use oil instead)
1/4 cup milk

What you do with it -

Pre-heat the oven to about 180 C (convection microwave) or 160 C (OTG)
Mix the flours, baking powder and baking soda in a bowl
The butter should be soft enough. Add this to the sugar and beat till the sugar has completely mixed in
Run the banana and about 2 tbsp of milk thru a blender / mixie
Add the orange juice and the pureed banana to the butter
Beat well and combine the dry ingredients into the this, mixing it in gently(a wooden or silicone spatula works best)
Add more milk if the batter is too dry
Line the muffin tray with paper holders
Spoon in the batter upto 3/4th level of the holder
Top it with some chopped almonds
Bake for 10-12 mins (May take upto 15 mins in the microwave convection mode)
Allow it to cool and then remove the muffins from the tray

Thursday, March 14, 2013

Kashmiri Rajma

I have a Kashmiri friend here and was invited for a lovely meal at her place some time back. This was perhaps the first time I was tasting authentic Kashmiri food.
My introduction to anything Kashmiri was some restaurant's version of Kashmiri pulao which was sweet, had raisins and cashew nuts and sugar with rice, which was a big no-no for me, at least at that point in time. Now I have slowly taken to having something sweet as part of a main course.

kashmiri rajma

She had invited some of us for lunch and made rajma, baingan, aloo dum, paneer in a white gravy and basmati rice. It was a delicious meal that wasn't spicy but had a wonderful flavour and everything was so aromatic without being overpowering

I absolutely loved her version of pressure cooker baingan sabji, which I intend making soon, but the simplest and tastiest dish that day was the Rajma, teamed with the very fragrant basmati rice
This, unlike the usual restaurant / Punjabi style rajma. It has some very different spices and the regular chole masala / rajma masala / garam masala can be easily avoided, and won't be missed at all

I called her for the recipe last week and made this. The kitchen was so fragrant with the whole spices added in the rajma and the basmati rice cooking away in my rice cooker. Add a little salt to the basmati rice while cooking it. When its done, allow it to cool slightly and then fluff it up with a fork, so you don't break any of the rice

Give this a try, chances are you may never go back to the other ways of making this

Kashmiri Rajma

What you need -

2 cups kashmiri rajma beans
1 heaped tsp saunf powder (about 1 tbsp of saunf powdered as fine as possible)
dry ginger powder (saunth)
1 stick cinnamon
1 black cardamom / badi elaichi (peeled opened slightly at the top)
2 green cardamom pods / choti elaichi powdered
star anise (optional)
1/2" piece ginger
3-4 garlic cloves
1 large onion
2 tomatoes
1 tsp chilli powder
a pinch of hing
1/2 tsp rajma masala / chole masala / garam masala (optional)
salt to taste

What you do with it -

Soak rajma in about 4 cups water and keep overnight
Drain the water, rinse in fresh water and then add 4 cups of water to the rajma
Add saunf powder, badi elaichi, choti elaichi powder, cinnamon stick and the star anise and pressure cook for 3-4 whistles
Chop the ginger, garlic, onions and tomatoes
Grind the ginger, garlic and onions to a smooth paste
Grind the tomatoes to a smooth paste (You can peel the skin and then grind the tomatoes)
In a pan, heat oil and add hing and red chilli powder in the oil
Add the ginger-garlic-onion paste and saute till the raw smell goes away
Add the tomato puree and stir well
Grind / mash about 2-3 tbsp cooked rajma and add it along with one cup of the water that the rajma was cooked in
Add the cooked rajma
Depending on the quality of the rajma beans, it may take longer to cook
Adjust the salt and add garam masala / rajma masala, if necessary
In case the rajma hasn't cooked, transfer everything to a pressure cooker and cook for 1-2 more whistles
If the rajma is cooked, add it to the pan and cover and allow the masala to thicken up
Serve hot with basmati rice

Monday, March 11, 2013

Tava Pulao

I have grown up eating freshly cooked food for every meal. Leftovers were really not preferred and I guess after once you get the estimate of cooking for the number of people right, you land up with less left-overs. The freezer to microwave concept never existed at home and I am not too fond of it myself. But wasting food has always been discouraged, so if there are left-overs, then its creatively modified or had as is, but it cannot go waste.

On a regular day, I spend a lot of time in the kitchen, specially in the mornings starting at 5.30am. First breakfast for my son, then his lunch to be packed. Their school is very particular and only home cooked food is allowed, no packeted food, and they prefer rotis and a sabji with some fruits. Then it breakfast for TH and me, we are not big on cereals and oats, so its usually a typical Indian breakfast with poha, upma, dosa, idli, parathas.
Lunch, evening snack for my son and dinner for all of us. So that makes it about 6 times in a day.

tava pulao

I hadn't heard of this tava pulao till TH had it from one of the street food stalls in Bombay / Mumbai many years back. The thelas or food stalls that usually make pav bhaji in the evenings, dish up this tava pulao for lunch near the crowded office areas of the Fort area in Bombay. The vegetables and the masala used in Pav bhaji are cooked on the tava and then the cooked rice is added to it. Lots of butter and some clang-clanging of mixing the rice with the masala are you are handed over this plate of hot delicious rice.

We are typically rice-eaters and I am consciously trying to cut down our rice intake at nights. I had some left over rice from lunch, a few veggies stocked up and some pav bhaji masala that has been languishing in the pantry, waiting to be used.
I do make pav bhaji but it isn't that often and I prefer to use up these masalas soon enough, definitely before its expiry date.
I remembered TH's description of that tava pulao and decided to convert this left-over rice

tava pulav with pav bhaji masala

Its really tasty because of the pav bhaji masala. A squeeze of lemon juice and a little butter add a lot to this dish. Served with some raita and you have a complete meal in about 10 mins.

Tava Pulao

What you need -

2 cups cooked rice
1 onion
2 tomatoes
1 capsicum
(Add more vegetables if you like)
1/2 cup shelled peas
1-2 tsp pav bhaji masala
1/2 a lemon
coriander leaves to garnish
1 tbsp butter

What you do with it -

Chop the capsicum, onions and tomatoes
Boil the peas with a little salt for 5 mins
Heat a little oil in a kadhai/wok or a deep tava/pan
Add the onions and fry for 2-3 mins on a high flame
Add the tomatoes, capsicum and peas
Add the pav bhaji masala and salt and 2-3 tbsp water
Once the vegetables are almost cooked, add the rice
Stir well ad then add the butter
Fry for 2-3 mins
Squeeze the juice of half a lemon over it and garnish with coriander leaves
Serve hot with raita / curds

Thursday, March 7, 2013

Linguine / Pasta with roasted peppers

There are so many different types of pasta available in the Indian market over the last couple of years now. When I was little, I think the first ever pasta I had was this alphabet shaped macaroni like pasta. It was such a hit with us kids and Ma would always put that in our soup. Macaroni is another very popular pasta with kids. Then I slowly got introduced to penne (cylinder shaped), fusilli (corkscrew shaped), spaghetti (long thin pasta), tagiatelle (long thin ribbon like pasta), farfalle (bow-tie shaped), canneloni (tubes, usually stuffed with filling) and more recently orzo (shaped like rice grains) and linguine. Linguine is almost like spaghetti but slightly more flat.

linguine with peppers

My son is a great fan of the movie Ratatouille and inspired by that, he has decided to open a restaurant when he's older, where I will cook, TH will settle bills and he will go on roller skates serving people !
When I told him what he was eating was Linguine, he looked a little shocked because the boy in the movie was called Linguine. For him pasta until now was either macaroni or noodle pasta(spaghetti). All other shapes are just called pasta.

There are many brands selling pasta in India right now and I keep trying different ones, but this linguine from Waitrose is really really good. The pasta cooks up beautifully and almost melts in your mouth as you eat, not because its overcooked, but because it is just so soft and perfect.

The roasted peppers give this a lovely flavour. For the basic sauce, I used this recipe here.

Linguine with roasted peppers
Adapted from Italina khana - Pasta by Ritu Dalmia

What you need -

200g linguine (flat and long pasta)
2 yellow bell peppers
2 red bell peppers
2 tbsp extra virgin olive oil
1/2 cup tomato basil sauce
2 fresh tomatoes
2 cloves garlic (chopped lengthwise)
a few basil leaves (I ran out of this)
garlic greens (optional)
salt and pepper to taste

What you do with it -

Apply a little olive oil over the peppers and roast them in the oven at about 150 C for 15 mins
Allow it to cool, then peel off the skin and cut into pieces
Deseed and chop the tomatoes
Heat a little olive oil and add the chopped garlic
Add tomatoes and the peppers and allow it to cook for 3-4 mins
Add the pasta sauce and cook for another 5 mins
Adjust the salt and pepper. The pasta sauce already has salt, so see that you don't add too much
Meanwhile cook the pasta in hot boiling water (as per the packet instructions)
Drain the pasta and keep 1-2 tbsps of the water (from the pasta) aside
Add the pasta water to the sauce and allow to cook for 2 mins
Serve pasta and the the sauce over it
Garnish with some chopped garlic greens
Serve hot

Tuesday, March 5, 2013

Oat and Ragi cookies

Ragi or finger millet is a part of the staple diet in the rural areas of Karnataka, especially among farmers. It is high in calcium, low on fat and provides a lot of energy to the body
I used a lot of ragi for my son when he was about a year old. I cooked the ragi flour in milk and then added some mashed fruits and it was a nutritious meal which kept him going for hours.

oat and ragi cookies

It is extremely rich in calcium and used regularly as baby food and for older people, who need the calcium intake. Ragi is also very cooling and in summers it is had with milk or buttermilk. Ragi with oats makes a very nutritious combination, though I must confess that I don't really like either of them unless its in a very interesting form, like these crunchy cookies.

You need to acquire a taste for ragi and it isn't something I can have as is, with milk or as mudde, the traditional way people have it in Karnataka.

ready to bake

I had seen this recipe for ragi cookies on Sanjeeta's blog and tried them once, but I must've gone wrong somewhere and it turned out slightly soft, so I added oats this time and it turned out really crunchy, just the way I like it. The oats adds to the taste and the nutrition and these cookies were a perfect snack with milk for my son. Thank you Sanjeeta for this recipe, would have never imagine cookies with ragi otherwise.

Ragi and oat cookies
(Adapted from Lite bite)

Makes about 30 cookies

What you need -

3/4 cup Ragi / finger millet flour
1 1/4 cup oats (I used quick cooking Quaker oats)
2 tbsp maida / APF
1 tbsp cornflour powder (I used custard powder)
2 tbsp cocoa powder
3/4 cup sugar (slightly lesser would also work)
3/4 cup softened butter
2 tsp curd / yoghurt
1.5 tsp baking powder

What you do with it-

Roast the ragi flour in a pan for 2-3 mins on a really low flame. Ensure that it doesn't get burnt
In a large bowl, add the ragi flour, oats, cornflour, maida and baking powder
Mix well and set aside
In another bowl, add the butter, curd and sugar. Mix till the sugar dissolves
Add the wet and dry ingredient and make a hard dough with it. If it is very soft, add a little more maida and form the dough
Wrap it in cling wrap and refrigerate for about 10 mins at least
(I baked the second batch with the dough that was refrigerated for about 4 hours and it worked fine)
Take the dough and make small balls. Lightly press them between your palms and then place them on a baking sheet
I used this baking mat that needs no greasing and the baked cookies can just be pulled off with no effort
Heat the oven to about 180 C. In my OTG (Morphy Richards 40L), I preheat it at 160 C for about 12 mins
Bake the cookies at 180 C or 160 C, as per your oven requirements for 12-15 minutes
Enjoy these crunchy healthy cookies with a cup of milk or tea

Friday, March 1, 2013

Matar Paneer / Cottage cheese and peas in an aromatic gravy

Paneer or cottage cheese is something that's been popular in North Indian cuisine, and not an inherent part of South Indian food. But with all the 'North Indian' restaurants opening all over in the cities in the South, it was almost mandatory for a person to order for something with paneer, if you ate out at one of these restaurants. Many years back, when I was younger, I remember some families that stuck to very traditional South Indian food at home, but insisted on something with paneer when they ventured out to eat.
The absolute standard order would be paneer butter masala, which was usually an oily, greasy masala with fried paneer floating in it. I could never get myself to even taste it, but people relished it. The slightly healthier option would be a palak paneer and sometimes, for a change, there would be an order for matar paneer.
Unfortunately North Indian food was always associated with a lot of oil and masalas, but that is not how their home cooked food is. Very few restaurants got it right back then, at least.

matar paneer

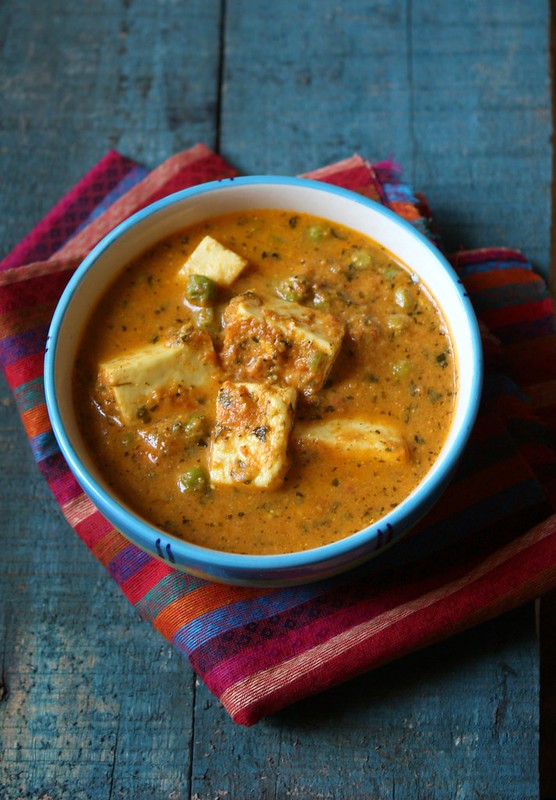
I was not very fond of paneer and it is something I started enjoying only when I had it home-cooked. This matar paneer is one such dish that I quite enjoy. The usual suspects that go into any such dish would be onions, ginger, garlic, tomatoes and some masalas. I decided to do it different this time. Onions are added to give some body to the gravy, but there are communities that don't eat onions for religious reasons and so substitute it with ground cashewnuts. I have used an onion and then added some sunflower seeds instead of the cashewnuts, to cut down on the calories and give it a different taste and texture.

Fresh paneer or home made paneer has a wonderful taste, but if you cant find that, and you only option is frozen paneer, then ensure that you keep the paneer in the 'fridge (not freezer). I keep it in the chiller tray of the regrigerator and it works just fine. Keep it out at least 10 mins to half an hour before you plan to use it. Boil a pan with water that should be enough to cover the paneer and then add a little salt. Once the water starts boiling, drop in the paneer pieces and turn off the heat in about 2 mins. Keep the pan covered till you use the paneer. You could also shallow fry the pieces, but deep frying really kills the taste of paneer completely, so please avoid that

Matar Paneer / Cottage cheese and peas in an aromatic gravy

What you need -

150 gm / 3/4 cup paneer / cottage cheese pieces
1 cup shelled green peas
1 onion (can be omitted)
3 pods garlic (can be omitted)
a small piece of ginger
2-3 green chillies
2 tsps sunflower seeds
2 large tomatoes
1/2 cup curds / yoghurt
1-2 tbsp oil (I used rice bran oil)
1/2 tsp turmeric powder
1 tbsp kasuri methi / dried fenugreek leaves
1 tsp chilli powder
1 tsp jeera powder / cumin seed powder
1/2 tsp sugar
1/2 tsp garam masala

What you do with it -

If you are using frozen paneer, thaw it and cut it in pieces
Heat water with a little salt in a pan and bring it to a boil
Drop the paneer pieces and turn off the flame in about 2 mins
Cover and keep aside
If using frozen peas, keep the peas in a bowl of warm water
If using fresh peas, bring the peas to boil in some water, or you could use the microwave to cook the peas
Peel the skin off the tomatoes and cut into large pieces
Roast the sunflower seeds on a low flame for 2-3 mins. Take care not to make it too brown
Chop the onion into pieces
Grind the onions, garlic, ginger, green chillies and roasted sunflower seeds into a smooth paste
Grind the tomatoes, curds and chilli powder to a paste
In a pan, heat about 1 tbsp oil, add kasuri methi and the ground onion paste
Allow it to turn slightly brown, adding about 1 more tbsp of oil, if required.
Once the raw smell of onions is gone, add the tomato-curd paste
Add turmeric powder, salt and cumin powder
Allow it to simmer for about 5 mins and then add the paneer and peas
Simmer for another 3-4 mins
Add the garam masala and the sugar
Stir once and take it off the heat
Serve hot with jeera rice or hot rotis

LinkWithin

Related Posts Widget for Blogs by LinkWithin