Wednesday, August 29, 2012

Theeyal for Onam

Onam is a beautiful festival celebrated in Kerala and by Malayalees around the world. My first association with Onam was when we had a 'rangoli' competition in school. I was terrible at using the coloured powders and making this, so I used the idea of the rangoli made with flowers - this is made during Onam, using colourful flower petals in a beautiful design. I used this idea and made one and I actually won !
Over the years, I have really enjoyed the food from this region. It reminds me of the food made at home, since both Mangalorean and Kerala cuisine use a lot of coconut.

We don't traditionally celebrate Onam, but I like to celebrate all possible festivals in my own little way, so that my child learns to appreciate what each community celebrates and also its a great chance to cook something new

theeyal

The recipe is from 'Flavours of the Spice Coast' by Mrs K M Mathew. It was my first ever (and only one so far) win from a blog. I got this book from Sig of Live to Eat almost 2 years back and have tried many recipes from it.
I had tried this theeyal with appams in Coconut Grove, a restaurant in Bangalore, many many years back and decided to try this at home today.
I love the taste of the chinna vengayam / button onions, so added more than the recipe asked for. They have a sweetish taste and not pungent at all. Goes beautifully with the spices and tamarind in this theeyal

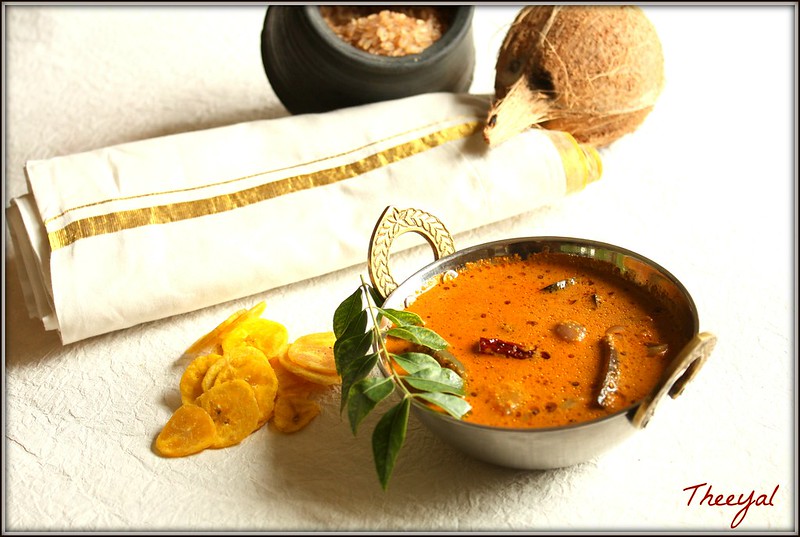
Kerala to me is beautiful beaches, amazing food, mundu veshti, endless stretches of coconut trees, banana chips, gold, red rice, fish, pappadum and many wonderful friends from this beautiful state. Happy Onam to all of you...
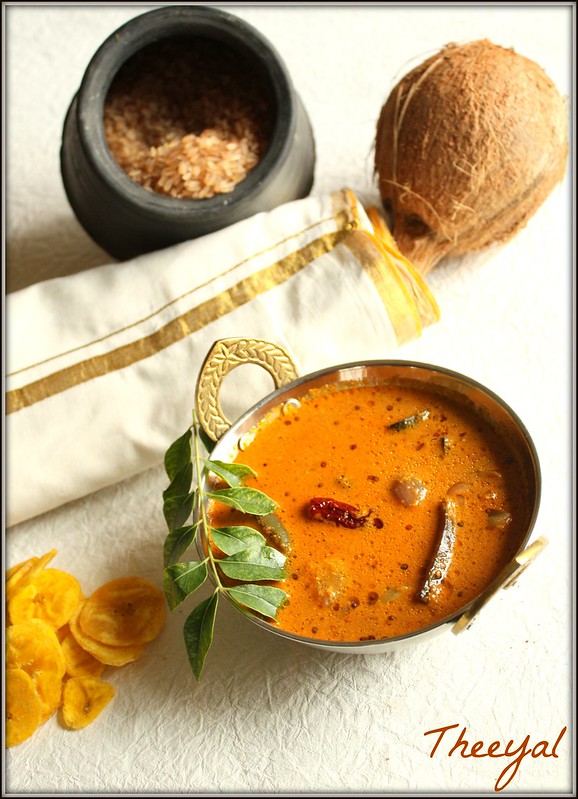
theeyal1

Theeyal
Adapted from Flavours of the Spice Coast by Mrs K M Mathew

What you need -

1 cup grated fresh coconut
2-3 red chillies
7-8 button onions
1 tsp coriander seeds
a pinch of turmeric powder
4 brinjals cut into 1" pieces
3-4 green chillies slit
a ball of tamarind soaked in warm water / 1/2 tsp tamarind paste
1/2 cup water
salt to taste
1 tsp oil

Seasoning
1 tsp oil (use coconut oil for an authentic taste)
1/4 tsp mustard seeds
2 red chillies halved
2-3 button onions sliced

What you do with it -

In a deep pan, roast the grated coconut, red chillies, coriander seeds and 2-3 button onions sliced. Then grind to a fine paste and keep aside
In the same pan, heat 1 tsp oil and add turmeric powder. Add the brinjal, green chillies and the button onions and saute well
Add the tamarind water / tamarind paste and ground masala
Add 1/2 cup water and bring to a slow boil till it thickens
Heat oil in a small pan for seasoning. Add the mustard seeds and allow to splutter. Add the red chillies and sliced onions. fry till the onions turn brown and then pour over the curry
Serve with appam or rice

Monday, August 27, 2012

Bharli Vangi / Stuffed eggplant - Repost

I am on this big project of remaking the first 50 dishes that I made when I started this blog. I managed to lose all the pictures that I uploaded directly in blogger. Took this as an opportunity to try out those recipes again.
Though I never accepted it, my family always accused me of cooking for the blog, (they are the ones who eat it, right ?), but I realised there are so many recipes that I perhaps tried just once for the blog and never made it again. Thanks to this project, I made these amazingly good ginger potatoes after a really long time.

bharli vangi

This stuffed eggplant / bharli vangi is another one of those recipes. We really enjoy this, but it hasn't been made as often as I would have liked. I did not have the round small brinjals the first time I posted it. I have used the earlier recipe from here, but made slight modifications. Also incorporated some tips from my Maharashtrian friend here. She told me they allow the brinjals to cook, by covering the pan with a lid and sprinkling some water on it, so that the brinjals don't stick to the bottom of the pan and get burnt.

bharli vangi ingredients

Traditionally, the stuffing is used in the brinjals and then the rest is sprinkled over it and allowed to cook. My aunt suggested that grinding the remaining ingredients and adding it, gives better texture and also adds volume, when you need it to serve it to a larger group of people.

Bharli Vangi / Maharashtrian style stuffed eggplant

What you need -

1/2 kg brinjals / eggplant (small round purple / green ones)
1/2 cup grated kopra (dry coconut)
2 onions
3 cloves
1 stick cinnamon
2 tsp goda masala / garam masala
1/2 tsp red chilli powder (if required)
2 tsp jaggery
1/2 cup coriander leaves chopped 
1/2 cup roasted peanuts
salt to taste

What you do with it -

Wash the brinjals and wipe them dry. Make slits in the shape of a 'X' on the round side of the brinjal, taking care that the brinjal doesn't come apart. the slits should be about half way thru the brinjal
Coarsely powder the roasted peanuts and place in a bowl
Finely chop the onions. Add the grated kopra and the onions to the peanuts
Add the garam masala or goda masala and jaggery
If you'd like more heat, add the chilli powder
Add salt and the chopped coriander leaves
Mix well and stuff this into the brinjals, taking care not to break them
In a shallow pan, heat a tbsp of oil and place these brinjals stuffed side down
Cover with a lid and sprinkle some water on the lid, so that the brinjals don't burn below
Heat oil in another pan and add cloves and cinnamon
Add the remaining mixture prepared for the stuffing. Fry for a couple of minutes till the onions brown a bit. Grind to a coarse paste
Add this paste along with 1/2 cup water, back to the pan of brinjals
Once the brinjals are cooked, take it off the heat
Serve hot with bhakris / rotis

Tuesday, August 21, 2012

Kancheepuram Idli / Kanjivaram Idli

Think Kancheepuram and the first thing that comes to your mind is the beauty of the Kancheepuram / Kanjivaram sarees. These are an absolute must at most South Indian weddings, especially Tamilian ones.
Last year, I was with my mother-in-law, shopping in Kancheepuram for my brother-in-law's wedding. The main road, called Gandhi street I think, is lined with Kanjeevaram saree stores and there are some small stores that specialize in silk dhotis for men as well. We were there on an auspicious day, to buy the 'muhurtam' saree for the bride.

It was tiring just watching so many many yards of beautiful woven sarees in so many vibrant colours. We stopped for some tea and idlis at a fairly popular restaurant there and shockingly, they did not have kancheepuram idlis ! I was really disppointed.

kancheepuram idli1

A slight twist on the regular rice idlis, these Kancheepuram idlis have it all spiced up ! This one is from Chandra Padmanabhan's book - Southern Flavours
Her family is from Kancheepuram, and this a century old recipe so I'm guessing, its as authentic as it gets.
I have had a variation that also has soaked chana dal in it, but this recipe did not have it. Makes for a nice breakfast with some coconut chutney

Kancheepuram Idli

Recipe Source: Chandra Padmanabhan's Southern Flavours

What you need -

1.5 cups parboiled rice / idli rice
1 cup urad dal
1/2 tsp asafoetida / hing
1 tsp pepper corns coarsely crushed
1" piece ginger, cut into tiny pieces (or 1.5 tsp dried ginger / saunth powder)
1 tsp cumin seeds
1/4 tsp salt
a few curry leaves
1 tsp ghee
1 tsp oil

What you do with it -

Wash the rice and urad dal and soak it for 2 hours
Drain and grind to make a coarse batter gradually adding 1/2 to 1 cup water. (The book says 1 3/4 to 2 1/2 cups water, which I felt was too much)
Transfer to a large container. Mix in the asafoetida powder, pepper corns, ginger and cumin seeds. Allow it to ferment for 12-15 hours. (The book says 24 hours, which again, with the heat in my part of the world, would have been way too much)
Heat oil and ghee, add curry leaves and allow to splutter
Add this along with the salt, to the batter just before making the idli
Smear oil on a flat round vessel or use the dhokla plates and pour in the batter. Place in an idli steamer / dhokla steamer / pressure cooker without weight and allow it to steam for 20 mins
Turn it over onto a plate and cut into wedges and serve with coconut chutney
The tip in the book says it must not be made in the usual performated idli mould. This plate works best.

Monday, August 20, 2012

Gujarati Kadhi

Ever since I moved to Ahmedabad, my taste buds have started adapting to the sweetish Gujarati food. Adding jaggery is not uncommon in Konkani cooking, but it manages to balance with ingredients that bring the sour and spice into that dish.

I never really liked anything sweet, and definitely not when I had it with rice, so the Gujarati dal and kadhi were not exactly on my list of favourites. Over the last few years and over the many many Gujarati thalis that I have enjoyed, I have developed a taste for the sweetish kadhi and the dal and now, I actually enjoy it.

gujarati kadhi

Kadhi is a staple in all Gujarati homes and generally had with khichdi and roasted papad. Its a soothing comforting meal, especially when the weather is a bit cloudy or cold. This kadhi is really fast to make and you have it ready in less than ten mins. So, its my quick fix dish in a food emergency.

Last week I met a friend for lunch and decided to make pooris for my little one, once I picked him up. I always have some shrikhand stocked at home, since my son adores it and loves it with pooris. TH was not supposed to be there for lunch. But as luck would have it, he called saying he was 5 mins away from and home and will have lunch before he proceeds for his next meeting.
Made khichdi, kadhi and pooris. Served this with pickle and shrikhand and it actually turned out to be one super fast yummy lunch for TH and my son.

As part of my project of updating my old posts with pictures, I made this bread pudding again. This, surprisingly, is the most read post on my blog. Its a simple quick and healthy dessert. Give it a try. Check out my post here

Gujarati Kadhi

What you need -

2-3 tbsp besan / chickpea flour
1/2 cup curd / plain yoghurt
1-2 green chillies
1/4 tsp turmeric powder
1 stick cinnamon
1/2" piece ginger
1 tsp salt
1-2 tbsp grated jaggery (depending on how sweet you like it)
3 cups water

Tempering

1 tsp oil
1/2 tsp mustard seeds
1/2 tsp cumin seeds
a few curry leaves
a pinch of asafoetida
1 red chilli broken into 2-3 pieces

What you do with it -

Mix the besan along with the curd in a bowl. Add the turmeric powder and water.
Beat this well using a whisk, electric beater or the simple Indian wooden churn
Slit the green chilli and slice the ginger. Add this to the bowl too
Add the salt and jaggery
Drop in the cinnamon and bring this to a boil, on a low flame, stirring every few minutes to ensure it does get too thick
Allow to simmer for 5 mins
For the tempering, heat the oil in a small pan and pop the mustard seeds and cumin seeds. Add asafoetida and then the red chillies and curry leaves
Take the kadhi off the heat and add the tempering
Serve hot with khichdi, pickle and papad

Thursday, August 16, 2012

Basil and cherry tomato focaccia

Yesterday was Indian Independence day. My son had to go to school for the flag hoisting, and then we watched the movie Gandhi that was showing on TV here.
That movie manages to inspire me, irrespective of the number of times I've watched it. At some points in life, Gandhi-ism, as a concept may seem a little irrelevant, with all the greed, ego clashes and violence that goes on all around the world. A person who worked selflessly for his nation is something we find hard to understand in today's generation, where each one believes that the world revolves around us.

My 6-year old had a lot of questions for me while watching the movie and I hope he manages to imbibe something from Gandhi's life and learn some of the selflessness and dedication of the many freedom fighters who fought for the India's independence.

Since its a National holiday, TH was also at home. I wanted to bake something and decided on this lovely focaccia I had seen on SJ's facebook page. She led me to this link on Sara's page. Thank you SJ and Sara, this turned out so good !

cherry tomato focaccia

I followed the recipe for the dough from Sara's page but changed the toppings a bit. I have this eternal problem of the crust never really browning enough. I am guessing its got something to do with the fact that I use the convection mode of my microwave to bake. Maybe an OTG will solve the problem. I've been postponing buying one only because I want to be really sure I will use it that much. But considering I bake at least once a week, I think I should go ahead.

focaccia4

I have narrowed down on the 40L OTG from Morphy Richards. I have read up many discussions on various fb groups and this seems like a good option. If you do own this one, do let me know how you like it or if you own any other brand that you think is good, please drop in your suggestions here. I'd love to have some options.

focaccia3

My son has never been fussy about food and now he has started enjoying watching food shows on TV. Masterchef Australia is one of his favourites. When I make something that looks a little fancy, he tells me 'Mamma, this is a Masterchef dish !' His friends' moms are always happy to have him over since he is full of praise for their food !
This one according to my little critic was a 'Masterchef dish'

focaccia1

This goes to Susan's Yeastspotting

I don't know how, but I seem to to have lost all the food pictures in the first 50 odd posts - all these were directly uploaded into blogger. Its a good chance to make these again and put up the pics, but if you know how I could possibly recover them, do let me know. I had the pics on a older laptop that crashed, so no saved copies either.

I made chow chow over the weekend and updated the post with that pic. Take a peek here

Basil and cherry tomato focaccia
Recipe source - Bake tales

What you need -

1 cup APF / maida
1 tsp instant yeast (I used gloripan)
1/2 tsp salt
1/2 tsp sugar
1 tbsp olive oil
1/2 cup lukewarm water

Topping
1 sliced onion
a few basil leaves
1/4 cup mozzarella
10-15 cherry tomatoes, quartered
sea salt
crushed pepper
2-3 tbsp olive oil

What you do with it -

In a large bowl, add the flour and mix in the salt and sugar
Make a well, pour in lukewarm water, olive oil and sprinkle yeast over the top
Bring it all together to form a ball of dough. It will be a little sticky, but that's fine
Knead using the base of your palm. Stretch the dough, roll it back, do a quarter turn and stretch it out again. As you work the dough, it will tighten up and become soft and springy
Knead for about 10 mins and then place in a greased bowl, cover with cling wrap and leave in a warm place till it doubles in size. It should take about an hour. I left mine for close to two hours, because it was pretty cloudy here.
Punch down the dough to expel all the air bubbles. Place it on a dusted worktop and cover with the bowl for about 10 minutes.
Press the dough down and roll it using a rolling pin, into the shape of the pan you are using. I made a 9" x 9" square
Grease the pan, place the dough into it and stretch to fill up the pan around the corners. Cover and allow to rise for 10-15 mins and then dimple with dough with your fingertips
Place the sliced onions and the cherry tomatoes on the dough. Tear the basil leaves and sprinkle over this. Crush the sea salt and sprinkle over the dough, along with the ground pepper
Make pieces of the mozzarella and scatter over the toppings. Drizzle the olive oil over it
Pre-heat the oven to 200 C and then bake for 20-22 mins, till its done
Allow to cool for a few mins. Slice and serve hot.

Monday, August 13, 2012

Tomato Rasam

I got married pretty young, at least way earlier than I thought I would. Since TH is from a different community, they did have a few reservations about me and how I would fit into the 'good South Indian daughter-in-law' bracket.
Though I am Mangalorean and was brought up in Bangalore, since most of my family is in Bombay, they did not consider me South Indian enough and they just assumed that a working girl from Bangalore would not cook, and definitely not their kind of food.

tomato rasam2

I got married in Chennai and two days later, we had a wedding reception in Bangalore. The whole family was there. While most of the gang went out shopping and visiting, TH's grandmother was at home, since she was too tired with all the travel. I, being the new bride, was all eager to please and stayed back to take care of her and I guess I was really done with shopping and socialising for a year at least !

I barely knew any cooking at that time, except for some fancy sounding dishes and maybe an egg burjee, but I knew that rasam was considered healing food, when you are a bit under the weather. I made some for her and Paati (grand mother in Tamil) relished it with some steaming hot rice. By the time the rest of the gang got back, she had had her nap and was really refreshed.

tomato rasam1

The first thing she told them was that I make great rasam, even better than what a Tamilian daughter-in-law would ! Can't tell you how much that meant to me - all the apprehensions of whether or not I'd really be truly accepted, disappeared thanks to this humble rasam. For me, its more than just something you have with rice, it was the first step to establishing a relationship with the in-laws...

There are so many varieties of rasam and so many variations, but this is one of my favourites. It still tops as comfort food for us, and is on the menu at least once a week. Had this for lunch over the weekend, with rice, pumpkin erissery and banana chips

Food, seriously, is the best way to anyone's heart !

rasam rice collage

Tomato Rasam

What you need -

1/4 cup tur dal
2 large or 3 medium tomatoes
2 tsp rasam powder (any brand would do, I used a local one from Bangalore)
a few sprigs of coriander leaves
4-5 pepper corns
1/2 tsp jeera / cumin seeds
2 cloves garlic (optional)
1/2 tsp mustard seeds
a pinch of asafoetida
1 tsp oil
salt to taste

What you do with it -

Pressure cook the dal with about 3/4 cup water. It needs to be really soft and mushy
Add the cooked dal in a vessel with 3-4 cups of water
Chop the tomatoes into 4 or 8 pieces, depending on how large the tomatoes are and add it to the dal
Add the rasam powder and bring it to a slow boil, till the tomatoes are cooked well
Add salt and coriander leaves
Using a mortar and pestle, crush the garlic, jeera and pepper to a coarse paste
For the seasoning, in a little oil, add asafoetida and mustard and allow it to splutter. Then add the crushed paste of jeera-garlic-pepper
Add the seasoning and take the rasam off the heat
Cover for 5 mins and then serve with hot rice

Friday, August 10, 2012

Fruit purée and raisin loaf

The last couple of weeks have been really crazy. My domestic help seems to have disappeared and its been really difficult. I hate the fact that I am so dependent on help, but its really been tough managing all the work at home, alone. And the worst part is that all this cleaning, washing and cooking feels like such a thankless job. The daily routine just gets to me somedays. I really miss my work life, my friends and family back in Bangalore.
I get into this mode sometimes, and I sit and wonder what I am really doing with my life. Then the routine takes over, before I realise and I am hardly left with time to think about it all.

I decided to bake my blues away and came up with this delicious healthy loaf

fruity loaf5

It basically started off as a banana loaf, but then I added a pear and an apple and realised that I had a whole bag of raisins stashed up, so wanted to use that too.
I often use fruit purée as an egg substitute when I bake muffins or loaves. It adds great flavour, cuts down on the fat and is definitely healthier !
I used this purée of bananas, pear and apples to make this really moist raisin loaded loaf.
Hopefully it will help me get my life back in perspective.

fruity loaf 2

What you need -

2 small bananas
1 pear
1 apple
1 cup raisins
1 cup APF / maida
1 cup wheat flour
1 cup brown sugar
1/2 cup milk
4 tbsp unsalted butter
1 tsp baking powder
1 tsp baking soda

What you do with it -

Peel the apple, bananas and pear and chop into pieces.
Blend to a puree with the sugar and a little milk, if required
Melt the butter and add it to the puree
Pre-heat the oven to 180 C. Line a loaf tin with parchment paper
In a bowl, sieve the flours along with the baking powder and baking soda
Roll the raisins in the flour, so its coated well. This helps it from sinking to the bottom while baking.
Mix the dry ingredients with a spatula and add to the purée. Add as much milk as required to get the batter smooth enough.
Combine and pour into the prepared loaf tin
Bake for 45 mins at 180 C
Allow it to cool for 10 mins before you slice it

LinkWithin

Related Posts Widget for Blogs by LinkWithin