Thursday, July 30, 2009

Peach Cobbler

Last week was wonderful..Cousins and ma were visiting and the weather was really nice..After one year of living here and cribbing endlessly about how hot it was, it finally cooled off and its been raining almost everyday for the last two weeks...
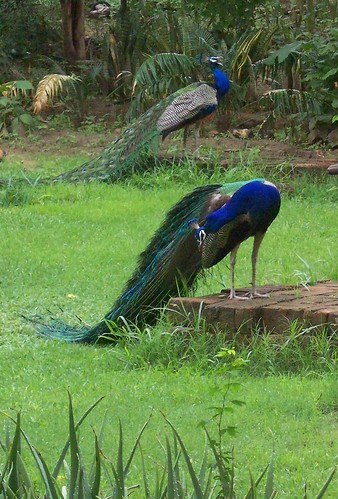
The nicest thing about this part of Ahmedabad is the number of peacocks we have walking around here. They stroll around even in the apartment complex. The rains made these birds wake up real early...you could hear them (and they dont sound so nice, they cry like little kittens, just much louder) from about 4 in the morning...A few weeks back, one of them had flown up to my balcony (on the 3rd floor) and till then I never knew peacocks fly !!
After telling you so much about the peacocks, I am really tempted to post one picture of them taken at a museum garden..Here are the handsome fellas...

Peacocks

Like it always happens when family is visiting, we did a lot of shopping, eating, chatting, even played scrabble till really late at night ! Made a whole lot of stuff from other blogs and mine - Red Chillies' baked nippattu, Miri's carrot coconut muffins, Sia's rhengan reveya, Ginger potatoes, Pesto Pasta, Corn Chowder, Spaghetti Bolognese with soy flakes(cousin's recipe) and the simple dal chawal, roti sabji on some days !

Peach Cobbler

One evening, we had a chaat party - aloo tikki with Ranjani's khattey meethey choley, paani puri and dahi batata puri.
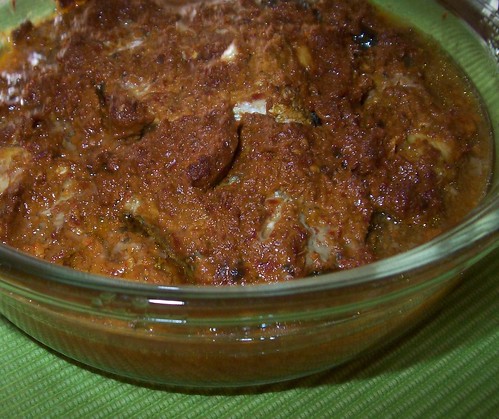
I had bought some peaches but wasn't sure what to make with them..My cousin promptly suggested a peach cobbler - I had never made or even tasted one before, so looked up and found this recipe on Food Network
It was really simple and tasted great.
I followed the recipe except for these few changes...
I didnt have brown sugar so used regular sugar mixed with some vanilla essence and cinnamon. I had two pears, so sliced them and added it up too..Also sprinkled some icing sugar on top...

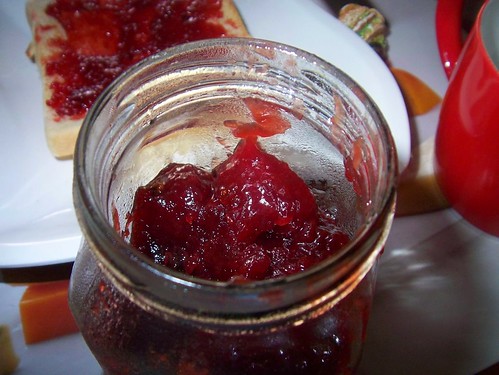
A spoonful of peachy yumminess...

Spoon pc

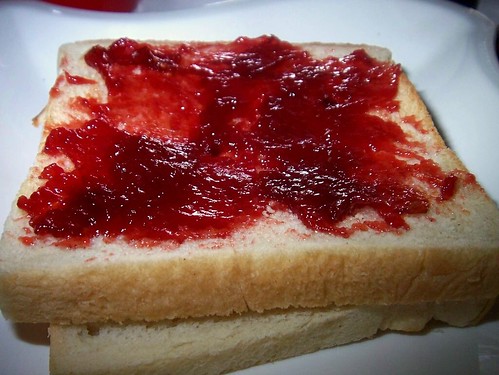
If you dont have peaches, I think apples and pears should work just fine

Monday, July 20, 2009

Choco-Nuttie Cookies

This was my third attempt at making chocolate cookies...It always failed at step 0, because the chocolate I buy to add into this is always polished off, either by my son, when it is at a level for him to reach, or by the sugar-starved husband, who claims that his hand actually shakes because the sugar content in his body is low !!

Cookies

This was one of those days when I just had to bake something. It was a wierd hour of the night, but the baking itch didnt go away. It was the day before TH's birthday, so thought I would give him his quota of chocolate...
No chocolate in the house, no shops open at the wierd hour when the baking bug bit, so I borrowed chocos from my son's quota of afternoon snack and found one small packet of almond nutties that someone had gifted my son. It was stuck behind a big jar of jam in the fridge and so survived the attack from these two men in my house...

closer look

Really simple to make, I claim its healthy because its got oats in it and the son and husband are super thrilled that I am offering them something chocolatey...
These were crisp, not chewy and I think we enjoyed this much more than the chewy ones..

What you need -

1 1/2 cups oats (powdered in a blender)
1 1/2 cups plain flour / maida
1/2 tsp baking powder
1/2 tsp baking soda
1/3 cup butter
2 tsps cocoa powder (unsweetened)
1/2 cup chocos
nutties (optional, use as many as you have as a topping to the cookies)
1 egg
1 cup sugar (powdered preferably, i didnt so you can see the crystals in my cookies)
1 tsp vanilla essence

You can leave out the chocos and nutties..The chocos were to add to the crunch and the nutties, because they were around..

What you do with it -

Beat the butter and sugar in a deep bowl till its smooth
Beat the egg and add to the butter and sugar mixing it lightly till combined well
Sieve the flour with the baking powder, baking soda and cocoa powder
Spoon the flour into the egg mixture
Add the vanilla essence and combine with a wooden spatula / spoon
Cover this and refrigerate for about half an hour, so its easier to handle
Pre heat the oven to 180C / 350F
Cut butter paper to size and spread on a baking tray
Shape the cookie dough into balls, flatten slightly and place on the baking tray atleast 2 inches apart, they tend to spread and flatten as they bake
Crush the chocos with a spoon or your hand
Add the crushed chocos on each cookie and then top it with the nuttie
Bake for 15-20 mins. Remove the butter paper with the cookies on it and set aside to cool. Do not pull them off before they cool completely
Bake the remaining dough similarly till the dough is all used up

Friday, July 17, 2009

Paan pole (Neer Dosa)

One more Mangalorean special coming your way...Ever since I saw this RCI on Udupi and Mangalorean cuisine, (hosted by Sia this month, an event started by Lakshmi), I cannot stop myself from blogging about all the Mangalorean cooking, especially the regular home food that you may not get in a restaurant.
This particular one though, is quite popular in most Mangalorean cuisine restaurants, and served with Mangalorean style chicken curries

Like I've mentioned in my earlier posts, coconuts are used a whole lot in Mangalorean cooking, here the dosa and the accompaniment has coconut in it !

Paanpole2

This neerdosa (neer = water in Kannada) / paanpole (In Konkani...paan means leaf and polo/pole means dosa), is really thin and soft, that why the name

I remember I once hosted this Dosa brunch at my place on a Sunday, where I made masala dosa with sambaar and chutney, pesarattu with tomato chutney and these paanpole with 'choon' (pronounce the 'ch' like the 'cz' as in 'czar', its more like a 'czoon')
My granduncle was also there and he said that it reminded him of the breakfast his mother made for him when he was a child. I was so touched, this was perhaps the best compliment I had recieved. This 'choon' is a no-cook accompaniment and goes great with paanpole(recipe below)

Paanpole can be served with any chutney, but this one is my favourite. A closer look at the choon...

Choon

Paan pole

What you need -

3 cups raw rice (use regular rice, its easier to grind than the boiled / idli rice)
2/3 cup grated coconut
salt
oil

What you do with it -

Soak the rice in water for 4-5 hours
Grind the rice with the grated coconut, adding water, to a very smooth and thin paste
Add salt and mix well
The batter should be really thin
On a hot tava, apply a little oil and take a ladle of batter and spread it, starting from the side and then towards the centre
Since its really thin, you will not be able to flatten and spread it like a regular dosa, you can instead lift the tava and swirl it around, so that the batter fills up the empty spaces (Reading this sounds more complicated that it actually is !!)
Cover the tava. This is meant to be a soft dosa, not crisp
This will not turn brown, so once it starts leaving the edges, flip it over and cook for a minute. Fold into a quarter and serve hot

Choon

What you need -

1/2 cup grated coconut
1/2 cup grated jaggery
1/4 tsp powdered cardamom

What you do with it -

Mix all the ingredients
Serve as an accompaniment with the paanpole

Wednesday, July 15, 2009

Spinach bread and Pesto Pasta

Last week, Ahmedabad finally saw some rains...Its almost like a desert here, hot, real hot dry summers and the winters are short, but quite cold.
Monsoon is not an official season here, it cant be, because it lasts for about 2-3 days..Last year, it rained for a day, the entire day, but that was it...complete dry spell after that

The hot weather here is great for baking, only because the yeast comes up beautifully, otherwise, the entire house feels like an oven. Temperatures are around 41 C - 44 C, for at least 4 months in a year and it just doesnt seem to be the right time to bake anything

Spinach bread

This particular day, it was sunny, but there was a lovely breeze, I decided to put my yeast to test again, made this spinach and cheese bread. By evening, the winds were really strong and in the apartment I live in, you could hear eerie sounds of the wind go thru the columns...It started pouring and went on for about 3 hours

Made this pesto pasta to go with the bread, sat out in our balcony and enjoyed the lovely weather, while muching on the bread and pasta. S was back home early and the change in weather was really welcome. I think this was the first day that I enjoyed being here.

Pasta

For the Pesto Pasta

What you need -

2 medium sized tomatoes
3 cloves garlic
2 cups of pasta / spaghetti
1/2 tsp salt
1 tsp red chilli flakes (optional)
2-3 tbsp milk

Pesto
1 1/2 cup packed, cleaned and chopped coriander
1/2 cup walnuts
4 cloves garlic
1/4 cup cheese
1 tsp olive oil
1/2 tsp salt
1/2 tsp pepper corns

What you do with it -

Grind together all the ingredients under Pesto to a smooth paste, without adding any water. Add more olive oil if required.
Add salt to water and bring to boil. Cook pasta in it as per instructions on the packet
Chop the garlic and tomatoes
Add a little olive oil in a pan and add then the garlic
Add in the pesto and stir, adding spoonfuls of milk
Add the pasta, salt and chilli flakes
Add tomatoes and turn off the heat
Add grated cheese over the pasta if you like

(You could substitute the coriander with spinach / basil)

Spinach Bread

This one is adapted from this wonderful book 'Baking' by Martha Day, which has well-explained simple steps to baking and great for a beginner like me
Skipped the bacon and use wheat flour instead of the AP flour

Sending this to Yeastspotting, hosted by Nick of imafoodblog this week

What you need -

4 cups wheat flour
1 1/2 cups water
1 onion
2 tsp active dry yeast
1 tsp sugar
2 cups chopped spinach
1 tbsp olive oil
1 1/2 tsp salt
1/4 cup grated cheese

What you do with it -

Put water in a bowl, sprinkle yeast and add sugar
Mix and allow to proof for 10-15 mins
Heat oil in a pan and fry the onion
Add the chopped spinach to this and stir till the spinach is cooked and dry
In a large bowl, add the flour and salt
Make a well in the centre and pour the yeast mixture
Add the onions and spinach and knead to make a soft dough, using a little more olive oil if required
Cover and keep aside for about an hour or till the dough has doubled
Grease a pan / loaf tin
Punch the dough down and knead lightly and transfer to the greased tin and allow to rise again for about 30 mins
Sprinkle the grated cheese over it
Preheat the oven to 200 C / 400 F
Bake the loaf for 25-30 mins. Transfer to a wire rack to cool

Sunday, July 12, 2009

Tomato Saar

Konaki cuisine uses a lot of coconuts - its the base for most side dishes, like bendhi, sukke, bhutti and for almost all the curries had with rice, like ambat, ghashi, saar, sambaren...
If its not used in the masala, then its part of the garnish at least. You will see very few dishes in Konkani cooking that do not use coconut.

Everytime there is a hint of an arguement of coconuts not being healthy, most pachchis (means mother's sister, but used for all 'aunties') are up in arms defending the poor coconut. They will give you lectures on how coconut and coconut oil is actually good for you.
Traditional Mangalorean cooking uses coconut oil for the seasoning. Specific types of Happol (papads) are fried only in coconut oil, because they taste best only that way !

Tomato Saar

This is a very simple and super tasty saar (something like a rasam, but thicker) with tomatoes and coconut. It has the spice from the green chillies, tangy tart flavour from the tomatoes and sweetness from the jaggery...
Simple to make and goes very well with rice and simple side dish like an upkari

I am thrilled that Sia is hosting the RCI event this month featuring Mangalorean and Udupi cuisine, orginally started by Lakshmi of Veggie Cuisine

To read my other posts on Mangalorean cuisine, see Dudhya Koddel, Pathrode, Tendle Bibbe Upkari, Tendle Bhutti, Khatkhaten and Solkadi

What you need -

4 tomatoes
3-4 green chillies
1 cup dessicated coconut
a few curry leaves
1 red chilli
1/2 tsp mustard seeds
a pinch of asafoetida
1 1/2 tsp salt
2 tbsp grated jaggery

What you do with it -

Blanch the tomatoes in hot water. Peel the skin off and keep aside to cool
Keep this water to use later. This is where the nutrients are
Grind the chillies, coconut and tomatoes in a blender till smooth
Add the water reserved earlier and a little more water if required, to the tomato-coconut paste
Add salt and jaggery and bring to a boil
Heat oil in a small pan and add mustard seeds, broken red chilli, curry leaves and asafoetida
Pour the seasoning over the saar and serve with hot rice

Thursday, July 9, 2009

Cabbage and Methi Zunka

My mom's lived in Bombay all of her pre-marital life...She has a lot of Maharashtrian friends and speaks excellent Marathi. Our language and food habits have a lot of Marathi influence though we were brought up in Bangalore.
I realised this when I visited a grand aunt in Mangalore and didnt understand quite a few of the pure Konkani words she used. At home, though we did speak Konkani, Ma would add in a lot of Marathi words and we assumed it was Konkani !

Luckily for us, Ma is really an excellent cook and has tried her hands at all cuisines, so we were exposed to food from different regions since we were really young, Maharashtrian cookign being one of the favourites.

Ma made it with either cabbage or methi leaves.
I bought this really lovely looking bunch of tender baby methi...

Picture 691

I started off to make a methi zunka, but cleaning this up took half a day and I was left with realy little, so added in cabbage too. It tasted awesome with dal and rice.

Zunka

What you need -

1 cup methi leaves
2 cup chopped cabbage
1 onion
1/2 tsp jeera / cumin seeds
1/2 tsp mustard seeds
3 tbsp besan / chickpea flour
a pinch of asafoetida
1 tsp sugar
1/4 tsp turmeric powder
1/2 tsp red chilli powder
half a lemon

What you do with it -

Chop the onion. Clean the methi leaves. Clean and chop the cabbage
Heat oil in a pan and mustard and cumin seeds
Add onions and fry till they turn a little pink
Add the turmeric powder, asafoetida and chilli powder
Fry a bit and add the chopped cabbage and methi
Add the sugar and tsp of salt
Cover the pan and allow it to cook
When its almost done, add the besan and stir well till done
(I love it when the besan turns brown and almost crisp-those are the brown bits you see in the pic)
Squeeze the juice of half a lemon over it

Tuesday, July 7, 2009

Manglorean style fish curry - Surmai Amshe Tikshe

I have these phases where I give up eating chicken for a few years and then, one fine day, I am back with a vengeance...I don't really miss eating chicken at all, but fish is one thing my true Mangalorean heart(or stomach, perhaps) cannot seem to give up !

There is this really modest looking eatery in Bangalore called Fish Land and the name says it all...They dish up the most amazing fish curries, fried fish and fish biryani. There is also this chilli chicken they make there which is so spicy that you have a runny nose, watery eyes and some fumes coming out of you ears when you bite into it !
Its a clean, no-fuss, no-frills place which serves up excellent Mangalorean fish thalis, chicken thalis and a variety of fried fish...
The taste of the fish curry there is so perfect and it hasn't changed in the last 18 years !
Yes, we've been going there for that many years, and the people at the restaurant know exactly what each one of us will order.
A cousin of mine who frequented this place with us, moved back to Bombay after a few years and the the person taking the order once asked us, where the 'chilli chicken' person was...
She always ordered that there and he didnt know any other way of identifying her...

On this visit to bangalore, Ma made this lovely amshe tikshe which was as good, if not better than the FishLand fish curry...
In Konkani, 'amshe' is sour and 'tikshe' is spicy. Thats exactly how this curry tastes.

Surmai Amshe Tikshe

There is a variation of the amshe tikshe, where you can omit the coconut, and bake the fish in the masala. Tried this after i learnt it from my aunt, back in Bangalore. I used a different variety of chillies, so the colour is distinctly different.

Hugga

To read my other posts on Mangalorean cuisine, see Dudhya Koddel, Pathrode, Tendle Bibbe Upkari, Tendle Bhutti, Khatkhaten and Solkadi

Sending this to Sia's RCI event this month RCI-Udupi & Mangalore, which was started by Lakshmi of Veggie Cuisine

What you need -

6-7 slices of fish (preferably seer)
20-25 red chillies (byadgi chillies give the perfect colour)
1 handful of tamarind
6-7 cloves of garlic
5-6 teppal / sichuan pepper
2 tbsp grated coconut
salt to taste
a pinch of salt and turmeric powder

What you do with it -

Clean the fish and apply the salt and turmeric powder and keep aside
Fry the red chillies in a spoon of oil till they turn deep red
Grind together the tamarind, fried chillies, garlic and coconut to a paste
Add only as much water as required
Apply this on the fish and marinate for about 20 mins
Heat oil (coconut oil, if you want the true taste) an add the teppal in it
It will fluff up a bit and tends to splutter, so be careful with this
Add 1/2 cup water and salt to the fish and bring to a boil
Add the oil with the teppal in it

You can use the same recipe to make hugga, another Konkani dish with the same masala.
Omit the step where you add water and bring to a boil
In this, you bake the fish
Apply coconut oil to the baking dish, place the fish with the masala in it
Add the teppal and salt
Bake in a pre-heated oven for about 25 mins at 180 C

Thursday, July 2, 2009

Plum Jam

There are loads of plums in the market here and my son had never tasted any, so bought a few to see if he'd like it..Till he was about 3, he never liked anything with a citric flavour, but now oranges and lemons have finally made an entry in his diet...
Surprisingly, he loved the plums, so I went and bought a whole load more and then he decided he didnt want to eat them any more...Now I was stuck with about 25 plums and a husband who does not believe in eating any fruit, unless they are juiced and a son who just didnt want to eat plums again...
I kept popping in plums everytime I walked by the kitchen till I got sick of it.

Bottled jam

I had never tried making jam at home - I always thought it was too complicated and messy...I didnt want these plums going waste, so finally looked up recipes for jam and I did it - made my first jam at home !!!

I kept tasting it as it was getting done and found it a bit sour. I didnt want to add any more sugar, so grated some ginger and squeezed the juice of it on the plums.
Then I added a few cloves too and it did add a lot to the flavour..

Plum jam and bread

It was super simple after all and turned out just great...The husband and son had it for breakfast today !!

What you need -

20 plums
1.5 cup sugar
1 cup water
1 tsp grated ginger
5 cloves

What you do with it -

Wash the plums well and wipe. Remove the stems if any
In a thick bottomed pan, add the plums, sugar and water
Keep it on a low flame. After about 10 mins, when the plums are all wilted and mushy, add the cloves and the juice of the grated ginger
Keep stirring every now and then
Check the consistency by dropping a bit on a plate. It shouldnt be runny and should look set
Remove the seeds once its almost done. The skin of the plums was soft and just melted into the flesh of the plums
Once done, allow to cool and store in jars
The jars need to be cleaned and dried completely in the sun or in a microwave

LinkWithin

Related Posts Widget for Blogs by LinkWithin