Tuesday, August 26, 2014

Cottage cheese and mint stuffed bread

Its time for this month's bread for WKTB. Aparna was busy with organizing the fabulous Foodbloggers meet in Bangalore and I was miserable that I couldn't attend it. Have been reading about all the fun and learning that happened at the meet and can't help feeling sorry for myself for being so far away.

side800

This month, since she was all tied up, she asked us to bake a decorative bread, filled with something savoury. I really love baking bread and its so much simpler than it seems, but never thought about making a decorative one. The most creative experiment with bread was my braided bread and I wanted to try something new this time.
stuffed bread8

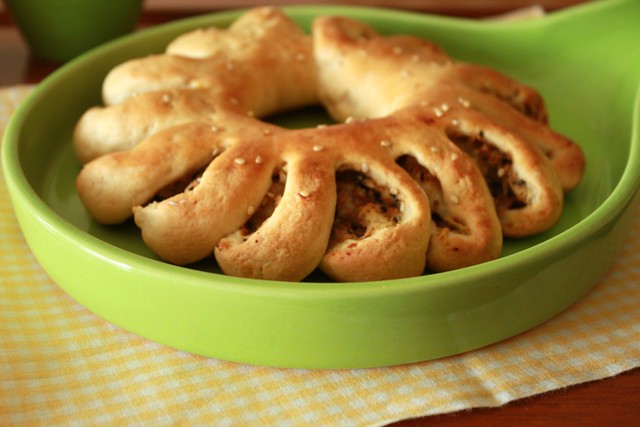
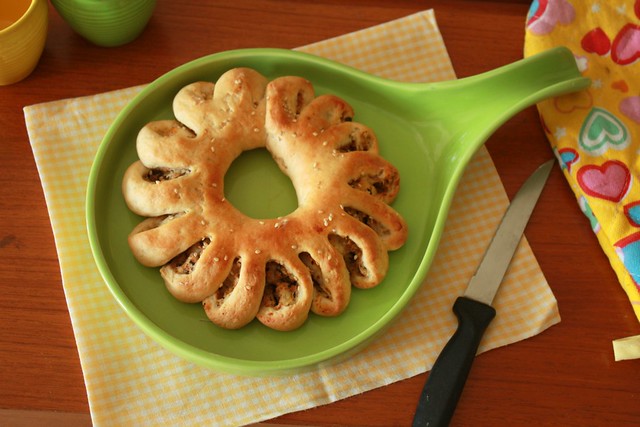
Inspired by this flower shaped bread here, I decided to make that. As usual, I was running late and though I was contemplating 20 different ideas for the savoury filling, I decided on this one with paneer and mint. It has lovely Indian flavours and the bread turned out quite pretty. I thought it looked like a flower, but my son insisted it looked like the sun !

coll5

It was quite a task to use the camera while shaping the bread. I used my phone and the pics aren't too great, but I hope it gives you an idea of how to make it

This bread is sent to Susan's Yeastspotting page.

Decorative stuffed bread
Adapted from ChefinDisguise

What you need -

2.5 cups maida / APF
1/2 cup wheat flour
3/4 cup warm milk
1/4 cup warm water
2 tsp instant yeast
4 tsp sugar
1/2 tsp salt
3 tbsp butter
For the filling -
1/2 cup cottage cheese / paneer
1/4 cup packed mint leaves
4 tbsp shredded cheese
1/2 tsp chilli powder
1/2 tsp cumin powder
a pinch of salt

What you do with it -

In a bowl, add the warm milk, warm water, butter, sugar and yeast and stir gently
In a large bowl, add the flours and salt
Make a well in the flour and pour in the yeast mixture
Knead for about 6-8 mins till a smooth elastic dough is formed
Place in a greased bowl and cover with cling wrap
Keep it in a warm place for about one and half hours or till it doubles in size
Meanwhile, crumble the cottage cheese and add the grated cheese to it
Chop the mint leaves really fine and add to the cheese
Add the spice powders and salt
Combine and set aside
Once the dough has risen, punch it down and divide it into two balls
Dust the surface with flour and roll out the ball of dough into a rectangle. Use a pizza cutter to cut the sides and get a rectangle shape
Place the filling on the rolled dough leaving about half an inch on each side
Start form the longer end and roll the dough to get a long pipe shape with the filling tucked inside
Turn the two ends towards each other and pinch the ends together to form a circle
Make slits at every 2 cms, a little more than halfway to the centre
Turn each slit to the right
Place a few sesame seeds on top and brush the bread with milk. Cover with a thin cloth and allow it to rise again for 15 mins
Pre-heat the oven to 200 C
Place the tray with the bread in the middle rack and bake for 25 mins
Brush with butter once its done.The stuffing has enough spice, but if you like, you could serve this with ketchup or a chutney

Monday, June 30, 2014

Komaj | Persian bread stuffed with dates

When I tried logging into my blogger account today, I actually needed a minute to remember my password. Either my memory is really failing me, or its been that long since I wrote a post. I know I enjoy cooking / baking and blogging, but some somehow the last couple of months, I just haven't been able to get myself to blog.

I am a part of this group called 'We knead to bake', started by Aparna of My Diverse Kitchen where we are given a new bread recipe every month. The fact that I might be out of that group if I skipped another month of baking made me finally get down to baking and posting. I'm glad there is some such rule, otherwise knowing me, I wouldn't get beyond the first month.

komaj5

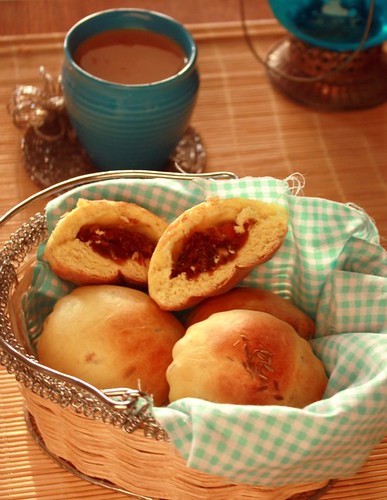
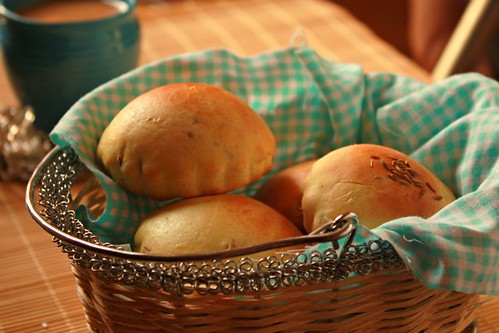
This month's recipe was Komaj, a Persian bread stuffed with dates. It involves 3 rises of the dough and sounded like a lot of work, but its actually quite simple. The stuffing is a lovely combination of dates, butter and cardamom. The dough also has a lot of Indian spices like turmeric and cumin. I was a bit skeptical about the combination of these very different flavours, but my love for dates made me try this and I'm glad I did !

openkomaj5

Have it as soon as you bake it and its wonderfully soft and delicious. The dates used are the dehydrated ones, but once baked, they almost melt in your mouth

Thanks Aparna for introducing us to this lovely bread. This bread is being Yeastspotted !

Komaj | Persian bread stuffed with dates

What you need -

Dough -
1 tsp instant yeast
1/8 cup warm water
3 3/4 cups APF / maida
2 1/2 tsp toasted and crushed cumin seeds
1/4 cup granulated sugar
1/2 tsp turmeric powder
1/2 tsp salt
1 egg (optional)
2/3 cups warm milk + 2 tbsp
1 1/2 tbsp olive oil

Filling -
12 seedless dried dates, chopped
1 tbsp butter, softened
1/2 tsp powdered cardamom
1 - 2 tbsp milk for brushing the dough

What you do with it -

If you use active dried yeast, dissolve the yeast in the warm water and keep it aside for 10 minutes till it froths up a little
I used instant yeast, so skipped this step and added it straight to the flour
Put the flour, 2 tsp of the crushed cumin, sugar, turmeric and salt in the bowl of your food processor and run a couple of times to mix. Then add the yeast, water and the egg and run the processor again, till it is incorporated.
Now add the milk and olive oil, and knead until you have a smooth and pliable dough that’s not sticky. I kneaded a little more milk that mentioned in her recipe. So added 2 tbsp of milk.
Shape the dough into a ball and place in a well-oiled bowl, turn to coat the dough and then cover with a damp cloth and let it rise till it has doubled (took me about 45 mins)
When the dough has risen, deflate it and then shape into a round. Put it back in the bowl for a second rise till it has doubled (another 45 mins).
Prepare the filling by mixing together the chopped dates, soft butter and cardamom together in a bowl.
Divide the dough in to 4 equal portions, and divide each in half so you have 8 portions. Working with one portion at a time, roll each one out into a rectangle that is about between 1/4" thick. I used a cookie cutter with a flower shaped edge that made the komaj look like a little tart !
Press it down lightly to make an impression on one half of the rectangle and add a tsp of the filling there

Brush with a little water over the dough and then fold over to encase the filling completely. Use the same cookie cutter and cut the dough. Press at the edges so the filling doesn't pop out during baking

Repeat with the remaining portions of dough. I got about 14 komaj since my cookie cutter was a little small.
Place these buns on a lightly greased baking tray leaving space between them because they will puff up on baking. Let them sit for about 15 minutes.
Pre-heat the oven to 200 C. Then brush them with a little milk / egg wash and sprinkle the remaining ½ tsp of crushed cumin on top, pressing it down a little with your fingers
Bake the Komaj at 200C (400F) for about 8 to 10 minutes
Allow them to cool slightly and serve with a cup of tea !

Tuesday, March 4, 2014

Stuffed red chilli pickle / Lal mirch ka achaar

Summer is almost here and I thought it was high time I posted this recipe of stuffed red chilli pickle that I made a couple of weeks back.
Winter is a lovely time to be in Ahmedabad. The weather is beautiful and you get some really lovely vegetables and fruits in this season. There are some that are really unique to this state, like ponk or fresh jowar, fresh tuver or pigeon pea and kand or purple yam. I had never heard of these before I moved here. Another really interesting one is the fresh red chilli, which I was always tempted to buy but never knew what to make with it.

red chillies

Fresh chillies drying in the sun

The really friendly and helpful vegetable vendor sometimes even gives me ideas of what I can make with the veggies that are new to me. Like mogri, or radish stems, which he even gave me a recipe for, but unfortunately I didn't like the taste of it too much, way too strong for my taste. He told me this is the red chilli that's used to make the red chilli stuffed pickle. That was the pickle I always enjoyed with parathas at the restaurants serving authentic North Indian food and I was thrilled with the prospect of making my own stuffed red chilli pickle ~

red chilli pickle

Pickle ready to be eaten

I love it with parathas, especially aloo parathas. This pickle is not terribly spicy but has the tangy, bitter and spice tastes all merged together to make it really irresistible. I was so thrilled with the idea of making this and two of my friends here gave me their aunt's / mother's recipes. I combined both these recipes and since I had bought just 10 chillies, I reduced the amount of all the spices, going by the great 'andaaz' or estimation, more than anything else. Its a miracle this pickle turned out right

chilli pickle

Chilli pickle getting sun-cooked

Here's the recipe after all my approximations. I will definitely make a bigger batch next season

Stuffed red chilli pickle / Lal mirch ka achaar

What you need -

10 large fresh red chillies

1/2 tsp turmeric powder
1 tbsp red chilli powder
1/4 tsp asafoetida powder / hing
3 tbsp dry mango powder / amchoor powder
3 tbsp black mustard seeds
1 tbsp fennel seeds / saunf
1 tbsp fenugreek seeds
2 tsp kalonji seeds / nigella
2 tbsp salt or to taste

1/3rd cup mustard oil

What you do with it -

Heat the mustard oil to smoking point first, set aside and allow it to completely
Wash chillies and allow to dry completely on a towel, leaving in a sunny place for a day
Dry roast the mustard, fenugreek and fennel seeds. Allow it to cool and then add the nigella seeds to it
Grind it coarsely and keep aside
Add 2 tbsp of oil to the spice mixture
Using a spoon, stuff the mixture into each chilli, whole or slit lengthwise, as you prefer
Add a little oil into each chilli and place these in a clean, dry glass jar and pour the remaining oil over it
Keep it in the sun for 2-3 days
Enjoy the pickle with parathas

Friday, February 28, 2014

Hummus (without tahini)

The first Mediterannean food I ever tasted was hummus and pita bread. Maybe I hadn't acquired the taste then and I found the hummus too pasty and strange. Pita bread felt more like a naan / kulcha, and I wondered what all the fuss was about.
A few years later when I tasted it again, the texture of hummus felt surprisingly nice and the warm pita went so well with it. Not sure the cook did a great job or I just developed better taste buds !

I started making it at home much later and my eight year old seems to really enjoy this now. I have made hummus only with chickpeas, though I have heard of sweet potato hummus and basil hummus, which I will get around to making soon enough

hummus

I am usually tempted to buy all these exotic ingredients when I see them, but now I stop myself. There are enough number of spices that I have picked up and trashed after a couple of years because of the expiry date and I would have used it just a couple of times, or perhaps just once when I felt inspired enough. I was very keen on picking up tahini, but thankfully better sense prevailed and I used my own substitution which turned out pretty good. I did however pick up bottle of za'atar spice, a mix of sumac, sesame seeds and some dried herbs.

Warm pita and hummus drizzled with olive oil can make for a really nice starter. Here's the recipe for the hummus I made.

Hummus

What you need -

1 cup dried chickpeas (soaked in water for 6-8 hours)
2-3 cloves garlic
1-2 tbsp olive oil
1 tbsp sesame oil
1/2 tbsp toasted sesame seeds
1/2 tsp red chilli powder
1/2 tsp roasted cumin seeds
a pinch of za'atar spice (optional)
juice of a medium sized lemon
salt to taste


What you do with it -

Drain the soaked chickpeas, add 2.5 cups water and cook till its soft but not mushy
Allow it to cool
In a small grinder, powder the cumin seeds and sesame seeds
Blend the chickpeas, garlic, sesame seed powder, cumin seed powder, olive oil and 1/2 the lemon juice
Add the sesame oil and salt and blend till its smooth
Sprinkle some red chilli powder, za'atar spice powder, lemon juice and olive oil and serve with warm pitas

Tuesday, February 25, 2014

Pita bread

Bread baking was something I never imagined myself doing. It seemed like such a big task, with the proofing, kneading, rising, baking, browning...But after I baked my first ever bread, a pretty fail-proof focaccia, I was hooked to it. The most satisfying part is that the wonderful aroma of fresh bread that spreads all over the house. I've heard that kneading the dough can be therapeutic, but with the daily roti-dough kneading which is more a chore that I'd happily have someone else to do for me, this bit did seem a bit over-rated !

pita

I've always wanted to bake my own pita bread and it seemed like the simplest of things to bake, considering it was very much like an Indian flat bread / roti that I am used to making on a daily basis. The first time I made it, it didn't fluff up at all and it was really disappointing. I guess I had missed out on the temperature settings, which are really crucial here since the bake time is not more than 5 minutes. So I gave this a try this time around, baking it for Aparna's We Knead to Bake #14, where we could choose to bake anything we liked.

pita with hummus8

My son is over eager when the camera is out and insists on clicking pictures himself or arranging the setting. He was rushing around acting really busy with the camera dangling on his neck and looking for 'props'. I didn't want to spoil the fun for him, but I really had my heart in mouth, wondering just when that camera would crash into something. the only way I could get the camera back was by telling him that I needed to take a picture of him with the pita bread. Phew ! So here's a pic with him (and his big hands) holding the pita pockets

pockets

Serve the warm pitas with hummus or fill the pita pockets with falafels and some salad. Recipe for hummus coming up next

This is being YeastSpotted

Pita Bread
Recipe Source - The Kitchn

Makes 6-8 small pitas

What You Need

1/2 cup warm water (not too hot to the touch)
1 tsp instant yeast
1/2 tsp sugar
1.5 cups maida / APF
1/2 tsp salt
1-2 teaspoons olive oil

What you do with it-

In a bowl, add the flour, sugar and yeast. Slowly pour in the warm water into this and stir
Add the salt and oil and start kneading it. I prefer working with the dough on a clean counter-top
Add a little flour if it gets too sticky and knead till it forms a smooth dough
Place this in a well-oiled large bowl and allow it to rise for an hour or so, till it doubles in size
Once its rise, punch it down and then divide into 8 small balls
(At this point, the dough can be refrigerated in a cling wrap if its not going to be used rightaway)
Using a rolling pin and a little flour, flatten the ball to form a small round (about 3" dia and 1/2" thick)
Pre heat the oven along with the baking tray to 220 C or 450 F
Place the rolled-out pitas directly on the baking tray / baking sheet and bake for about 3 minutes
The pita will start to puff up after a minute or two
You can also bake them on the stove top using a skillet. You will need to flip over the pita and cook on both sides if using the stove-top method
Keep the baked pita covered in a clean cloth
Serve immediately to really enjoy the fresh and fluffy pita
Serve with some hummus or use the pita pockets and stuff with falafels and some salad

Saturday, February 15, 2014

Rice and Lentil Pilaf

There are days when I love to cook up a storm and then there are many days when I just want to get done with a quick-fix meal. A one-pot meal is what works best on such days. I like having a pulav / pilaf with veggies and a raita to accompany it. The last couple of days we have some plumbing work on in the house and I haven't been able to step out. There were hardly and vegetables at home and with a dusty kitchen, my options for lunch were limited. I decided on this one-pot rice and lentil dish my Ma had made when I visited her last summer

masoor pulav

It's a simple recipe for a one-pot nutritious dish with rice and lentils. The lentils used here are whole masoor. The masoor should ideally be soaked for 8 hours or so, but if you are in a rush, soak in warm water for half an hour and use

Lentils are high in fiber and good for a healthy heart. With rice and the spices, this pulav with raita and some papad made for a nice lunch.


Rice and Lentil Pilaf
Serves 2-3 people

What you need -

1/2 cup masoor
1 cup rice
2 onions chopped
3 cloves garlic
1/2" piece ginger
2 green chillies
2 tbsp coriander leaves chopped
1 tsp coriander / dhania powder
1 tsp cumin / jeera powder
1/2 tsp garam masala powder
salt to taste
2-3 tsp oil
a few cashewnuts (optional)

What you do with it -

Soak the masoor for 6-8 hours. Rinse and set aside
Wash and rinse the rice
Grind / Pound the ginger, garlic and green chilli
Add 2.5 cups of water to the rice and masoor and cook till its done, without the rice getting mushy
I put it in a cooker, without the pressure / weight on and cook for 20 mins
Meanwhile heat oil in a large pan and add the ginger-garlic-green chilli paste and fry for 2 mins
Add the onions and fry till its golden brown
Add the coriander powder and cumin powder
Fry for 2-3 mins, adding a spoon of oil, if required
Once the rice is done and cooled slightly, add the rice-masoor to the fried onions
Stir lightly and allow it to cook in the pan for 3-4 mins
Garnish with coriander leaves and fried cashewnuts
Serve with a raita

Friday, January 24, 2014

Focaccia Caprese | We Knead to Bake #13

I joined this group called 'We Knead to Bake' started by Aparna of the lovely blog, My Diverse Kitchen. I had to wait almost an entire year to get into this group, so this is really the first one I am baking with them, but their 13th.
It always fun to bake in a group, even if the group is a virtual one ! Its inspiring and you feel good about being in the company of some fantastic bakers and more importantly, people who like baking.

focaccia caprese

Aparna gives us a recipe each month and this time its Focaccia Caprese. This needed Mozzarella and fresh tomatoes. Here in Ahmedabad, the dairy products are really good, not surprising considering Amul is about an hour away from here! There is this other place called 'Jain Dairy', which has amazing dairy products. I got the mozzarella from there and it was fantastic !
Bread baking can be simpler than the regular Indian cooking, once you get the hang of the yeast beast. Thankfully, I've had a pretty good working relation with the yeast and so we get along just fine. What's made life easier is that I discovered instant yeast, thanks to Sayantani and Suma. Its a dream to work with, no worries about the proofing, just a fairly sunny day and you're set ! I've even tried it on a gloomy rainy day and it still worked fine.

This focaccia has this really aromatic herbed oil which gives it a great flavour, along with mozzarella and fresh tomatoes. Its a great recipe and it you are yet to begin baking with yeast, this is a great start. Focaccia is the easiest of breads and tastes great.
I baked mine for a minute or two more to allow the cheese to melt a little more. The one with the slightly melted cheese got chomped in minutes and I had no time to click the pictures. This one was made to my son's taste, who didn't want to see so much cheese!

focaccia800

This is being Yeastspotted !

Focaccia Caprese

Recipe Source : Aparna of My Diverse Kitchen, adapted from The Kitchen Whisperer

What you need -

For the dough :

2 tsp instant yeast
1.5 tbsp sugar
3.5 cups maida (I did not have vital gluten, used plain flour)
1 tsp salt
1/4 cup olive oil
1 to 1 1/2 cups warm water
A little more olive oil for brushing dough

For the Topping:

4 large tomatoes sliced
1 small round of fresh mozzarella
a few fresh basil leaves

For the Herbed Oil:

1/4 cup olive oil
1 tsp dried oregano
1 tsp dried basil
1/2 tsp red chilli flakes
1 tsp finely minced garlic/ paste
Salt to taste

Fresh basil leaves for garnishing

What you do with it -

To make the herbed oil, add all the ingredients listed under herbed oil and whisk well. Set it aside.

In a large bowl, add the yeast, sugar, flour, salt and oil. Combine and add 1 cup of warm water and knead until you have a soft elastic dough. I knead it on my kitchen platform (thats been scrubbed clean). Its much easier this way for me.

Grease a bowl with a little olive oil and place the dough in it. I tend to apply a little oil over the top of the dough too. Then cover the top of the bowl with a cling wrap. From my experience with breads so far, this works better than covering it with a thin cloth. Allow it to rise in a warm place. This could take between 40 mins to an hour

Once the dough has risen, divide it into 2,3 or 4 parts, depending on what size you want. If you are not using it all, wrap the unused dough in cling film and refrigerate it. Bring it to room temperature and then proceed. I used this dough to make 3 medium sized focaccia. I made 2 first, refrigerated the remaining dough, after the first rise and made the next one a day later. It turned out just as good.

Pre-heat the oven at 200-210 C

Roll out the dough or just use your hands to stretch it to the shape you want, it really doesn't matter. I prefer rectangle or oval. Place the dough in a greased baking tray. Allow it to rise for about 20 mins. the dough gets pretty springy at this stage. Oil your fingers slightly and then make little 'dimples' in the dough, that are fairly well-spaced. Grease the top of the dough with oil

Bake for about 15-20 mins till the sides are golden brown. Take it out of the oven and raise the temp of the oven to about 230 C

Using a spoon, pour the herbed oil over the focaccia and then place slices of mozzarella over it. Top the mozzarella with tomato slices. Bake for another 5-10 mins, till the cheese has melted. Remove from the oven and top with fresh basil leaves
We had this with minestrone soup for dinner and again for breakfast the next day, freshly baked, of course!

Wednesday, January 22, 2014

Multigrain Paniyaram

The weather in Ahmedabad has dipped and its been raining last couple of nights, which has made it so cold and foggy here, which is definitely a welcome change from the usual hot months that we have about 8 months in a year !

Breakfasts are always a big task for me, not so much the preparing, but the big question of what to make for breakfast ! I am not so into cereals and milk for breakfast, give me a nice hot Indian breakfast any day, and I'm one happy person.


I also prefer something fast, easy, healthy and tasty. This one fit the bill perfectly !
Paniyaram / Appe is a favourite, and this is an instant recipe, so saves up so much time of soaking, grinding, fermenting, etc..
A spicy onion tomato chutney, some hot tea and it was a perfect breakfast

Multigrain Instant Paniyaram

Serves 2-3

What you need -

1/2 cup oats (I used Kellogs)
1/2 cup multigrain flour (I used Ashirwad)
1/2 cup rice flour
1 cup sooji / rava / cream of wheat
1 onion finely chopped
2-3 green chillies
1/2 tsp mustard seeds
1/2 tsp chana dal
1 cup curd
1/2 tsp baking soda or 1 small sachet of Eno fruit salt

What you do with it -

Beat the curds with 1/2 cup water
Soak the oats, rice flour, multigrain flour and sooji in the curds
Add a little salt
In a pan, add a tsp of oil and heat
Add mustard seeds, chana dal and allow to splutter
Add the green chillies and onions
Fry for 2-3 mins
Then add this over the batter
Add the baking soda / eno and mix well
Heat the paniyaram pan with a drop of oil in each cavity
Add a spoonful of batter in each cavity and cover and allow to cook for 1-2 mins
Flip it over with a spoon or fork and leave uncovered for a minute
Serve with chutney or sambar

Thursday, January 16, 2014

Tomato pickle

I've been waiting to restart my blog in the New Year with something sweet, and I know if I keep waiting for that to happen, we may just cross a few months or so. I have been posting at this blog in fits and starts, and somehow not able to maintain the flow.
Here's my aunt's recipe for an amazing tomato pickle. I can't really categorize it as a South Indian tokku or as a North Indian achaar. I got this recipe from my aunt. Last time she visited, she brought me a big bottle of this pickle and we had it with parathas, dal-chawal, bread, anything that needed a little zing.


Its tangy, sweet and spicy,and goes well with anything.
With the abundance of tomatoes in the market and this being the perfect weather for it, I finally got down to making this pickle.
Give it a try, its simple to make and tastes yum !
Here's hoping your year ahead is filled with its sweet, tangy and spicy moments.

Tomato pickle / Tomato relish

What you need -

1 kg tomatoes
25gm / 8 cloves garlic
25gm / 2" piece ginger
4-6 green chillies
10-12 curry leaves
3 tsp mustard seeds
1 tsp fenugreek / methi seeds
3/4 cup oil
1/2 cup plus 1 tsp vinegar
1.5 tsp salt
3-4 tbsp sugar
3 tsp red chilli powder

What you do with it -

Wash, wipe and chop the tomatoes into small pieces
Finely chop the ginger, garlic and green chillies
Wash, wipe and chop the curry leaves
Roast the fenugreek seeds and powder it along with the mustard seeds
Grind half the quantity of ginger, garlic and green chillies and keep aside
In a large pan, add 3/4th of the oil and add the fenugreek-mustard powder
Add the ground garlic-ginger-chilli paste and the chopped ginger-garlic-chillies
If you feel the oil is less, add more as required.
Add the chopped curry leaves, tomatoes and vinegar and allow it to cook on a low flame
Once the oil starts separating, add the salt, sugar and red chilli powder
When the oil thickens (takes about 10-12 mins), turn off the heat
Allow it to cool completely and store in a clean glass bottle

LinkWithin

Related Posts Widget for Blogs by LinkWithin