Showing posts with label Pickles Chutney and Jam. Show all posts

Tuesday, March 4, 2014

Stuffed red chilli pickle / Lal mirch ka achaar

Summer is almost here and I thought it was high time I posted this recipe of stuffed red chilli pickle that I made a couple of weeks back.
Winter is a lovely time to be in Ahmedabad. The weather is beautiful and you get some really lovely vegetables and fruits in this season. There are some that are really unique to this state, like ponk or fresh jowar, fresh tuver or pigeon pea and kand or purple yam. I had never heard of these before I moved here. Another really interesting one is the fresh red chilli, which I was always tempted to buy but never knew what to make with it.

red chillies

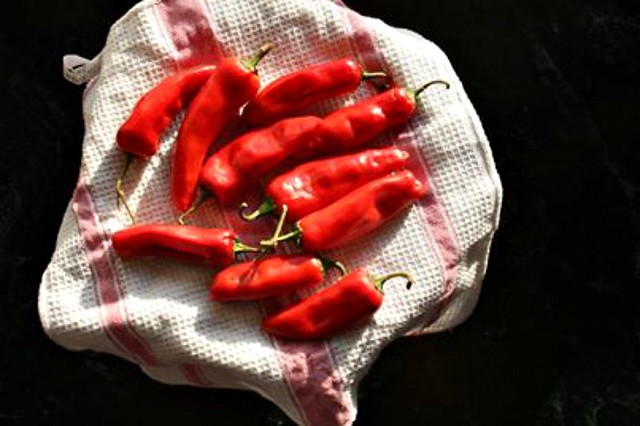
Fresh chillies drying in the sun

The really friendly and helpful vegetable vendor sometimes even gives me ideas of what I can make with the veggies that are new to me. Like mogri, or radish stems, which he even gave me a recipe for, but unfortunately I didn't like the taste of it too much, way too strong for my taste. He told me this is the red chilli that's used to make the red chilli stuffed pickle. That was the pickle I always enjoyed with parathas at the restaurants serving authentic North Indian food and I was thrilled with the prospect of making my own stuffed red chilli pickle ~

red chilli pickle

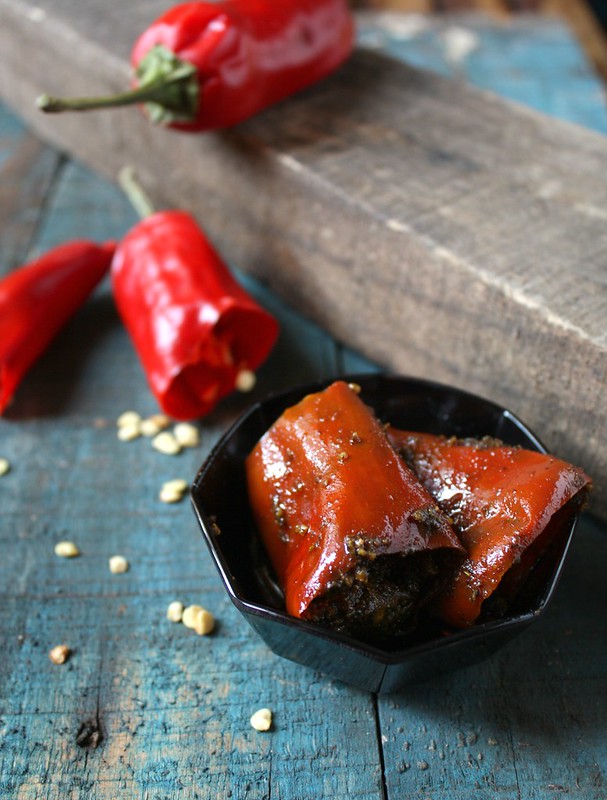
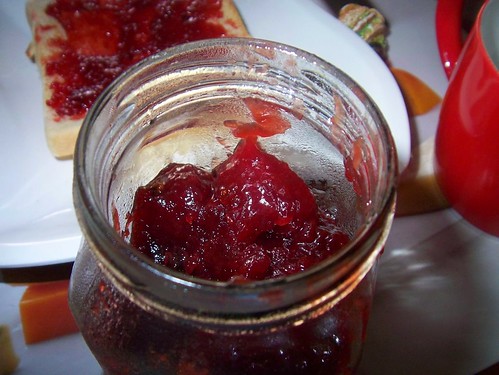
Pickle ready to be eaten

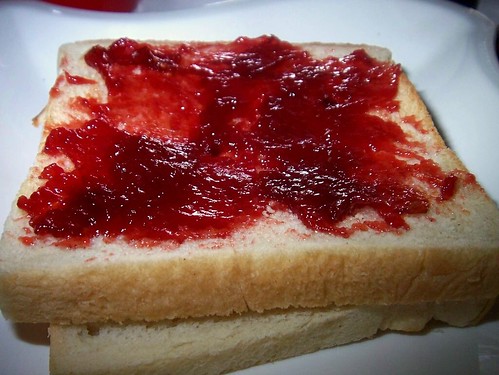
I love it with parathas, especially aloo parathas. This pickle is not terribly spicy but has the tangy, bitter and spice tastes all merged together to make it really irresistible. I was so thrilled with the idea of making this and two of my friends here gave me their aunt's / mother's recipes. I combined both these recipes and since I had bought just 10 chillies, I reduced the amount of all the spices, going by the great 'andaaz' or estimation, more than anything else. Its a miracle this pickle turned out right

chilli pickle

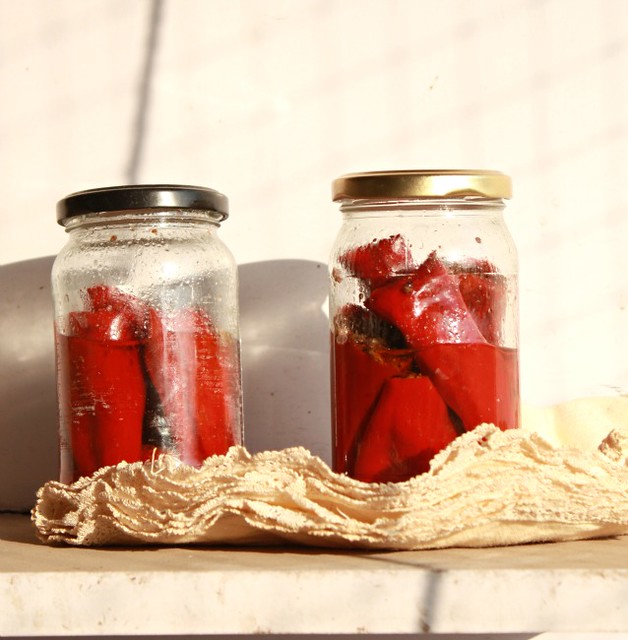
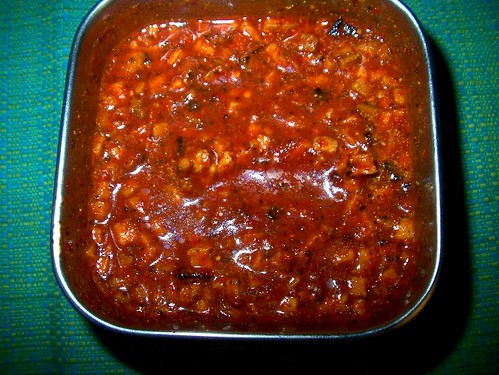
Chilli pickle getting sun-cooked

Here's the recipe after all my approximations. I will definitely make a bigger batch next season

Stuffed red chilli pickle / Lal mirch ka achaar

What you need -

10 large fresh red chillies

1/2 tsp turmeric powder
1 tbsp red chilli powder
1/4 tsp asafoetida powder / hing
3 tbsp dry mango powder / amchoor powder
3 tbsp black mustard seeds
1 tbsp fennel seeds / saunf
1 tbsp fenugreek seeds
2 tsp kalonji seeds / nigella
2 tbsp salt or to taste

1/3rd cup mustard oil

What you do with it -

Heat the mustard oil to smoking point first, set aside and allow it to completely
Wash chillies and allow to dry completely on a towel, leaving in a sunny place for a day
Dry roast the mustard, fenugreek and fennel seeds. Allow it to cool and then add the nigella seeds to it
Grind it coarsely and keep aside
Add 2 tbsp of oil to the spice mixture
Using a spoon, stuff the mixture into each chilli, whole or slit lengthwise, as you prefer
Add a little oil into each chilli and place these in a clean, dry glass jar and pour the remaining oil over it
Keep it in the sun for 2-3 days
Enjoy the pickle with parathas

Thursday, January 16, 2014

Tomato pickle

I've been waiting to restart my blog in the New Year with something sweet, and I know if I keep waiting for that to happen, we may just cross a few months or so. I have been posting at this blog in fits and starts, and somehow not able to maintain the flow.
Here's my aunt's recipe for an amazing tomato pickle. I can't really categorize it as a South Indian tokku or as a North Indian achaar. I got this recipe from my aunt. Last time she visited, she brought me a big bottle of this pickle and we had it with parathas, dal-chawal, bread, anything that needed a little zing.


Its tangy, sweet and spicy,and goes well with anything.
With the abundance of tomatoes in the market and this being the perfect weather for it, I finally got down to making this pickle.
Give it a try, its simple to make and tastes yum !
Here's hoping your year ahead is filled with its sweet, tangy and spicy moments.

Tomato pickle / Tomato relish

What you need -

1 kg tomatoes
25gm / 8 cloves garlic
25gm / 2" piece ginger
4-6 green chillies
10-12 curry leaves
3 tsp mustard seeds
1 tsp fenugreek / methi seeds
3/4 cup oil
1/2 cup plus 1 tsp vinegar
1.5 tsp salt
3-4 tbsp sugar
3 tsp red chilli powder

What you do with it -

Wash, wipe and chop the tomatoes into small pieces
Finely chop the ginger, garlic and green chillies
Wash, wipe and chop the curry leaves
Roast the fenugreek seeds and powder it along with the mustard seeds
Grind half the quantity of ginger, garlic and green chillies and keep aside
In a large pan, add 3/4th of the oil and add the fenugreek-mustard powder
Add the ground garlic-ginger-chilli paste and the chopped ginger-garlic-chillies
If you feel the oil is less, add more as required.
Add the chopped curry leaves, tomatoes and vinegar and allow it to cook on a low flame
Once the oil starts separating, add the salt, sugar and red chilli powder
When the oil thickens (takes about 10-12 mins), turn off the heat
Allow it to cool completely and store in a clean glass bottle

Monday, March 25, 2013

Fig preserve

Ever since I bought these beautiful figs, I have been scouring my recipe books and the blogosphere for something interesting that i could make with it. I can eat them fresh, love them that way, but wanted to make something with it. By the time I short-listed a few ideas, these delicate figs were already starting to shrivel up a bit.

Baking something with it was a great idea, but again I can sure do without the flour, butter and sugar, so I decided on a simple fig preserve, that way I get to taste them even when they aren't in season any more.

fig preserve
Fig preserve

I didn't realise how simple making a preserve would be. It just took like 5 mins of my time and about 30 mins on the stove, where I really need to do much other than peep in once in a way to check how it was all going.

figs
Fresh figs

Preserves usually use whole fruits and is more chunky and gives you the real flavour of the fruit. This has no pectin and the only added flavour was the cinnamon, which seemed to pair up beautifully with the figs

figs for preserve
Figs ready to get 'preserved'

We have had this fig preserve with some parathas, spread it over bread, used it as a topping on vanilla ice-cream and it works fantastically any way you'd like to use it.

fig preserve2
Fig preserve

I like the chunky bits that come in the preserve and when I was storing this in the jar, I stuck in the piece of cinnamon that I used to cook with the figs. The cinnamon continues to give its wonderful flavour into the preserve. Simple, pectin-free and pretty low on the sugar. This one really worked well for me

Fresh fig preserve

What you need -

10 figs
3 tbsp granulated sugar
1-2 long sticks of cinnamon broken into two
juice of one lemon

What you do with it -

Wash the figs and then cut them in quaters
Place them in a thick bottomed pan
Sprinkle the sugar and lemon juice over it
Throw in the two pieces of cinnamon
Keep it on a low flame for about 25-30 mins
Cover it for the first 10-15 mins, but keep checking on how fast it cooks
There is no need to add water. The lemon juice and sugar work well enough for this
Once the figs start to break up, stir them a bit
If there are very large chunks of figs, break it down gently with a fork and continue cooking it till it all done and there is not much liquid remaining
Sterilise the jar that you will be storing this in
I just put the jar in a large pot of hot water and allow the water to boil for 10 mins
Take the jar out and allow it to dry it in the sun. Ensure that there is no moisture in the jar
Once the fig preserve has cooled down, transfer it to the jar
Store it in the refrigerator

Thursday, June 28, 2012

Mango chutney / Aam ki launji

This mango chutney was accidental. It was originally intended to be chunda or chundo, the famous Gujarati sweet and spicy mango preserve. My friend had given me a bottle of it a couple of months back and I had with theplas and khakras and it was over in a week !
This time I told her I would join her in making this. This is made in summer since it needs to be kept out in the hot sun for a couple of days, and for our luck, just when we decided to start our chunda project, it got all cloudy and rainy...

mango chutney

I had bought the Rajapuri mangoes that are used specially for chunda, but by the time the sun was out again, the mangoes had ripened. It was quite disappointing, but my friend suggested making launji instead, a sweet and spicy chutney. This is her grandma's recipe.

The chutney turned out really tangy, a little sweet, a little spicy in each bite. I loved this one and its so much easier than the chunda ! Had this with ajwain parathas, and the combination was finger-licking good !

Mango chutney

What you need -

1 cup chopped mango (what I used was ripe, but not too ripe)
2-3 tbsp sugar (adjust as per the sweetness of the mango)
1/2 tsp mustard seeds
1/4 tsp fenugreek / methi seeds
1 tsp fennel seeds / saunf
1/4 tsp turmeric powder
2 red chillies broken in half
1/2 tsp red chilli powder
1/2 tsp salt or to taste
1 tbsp oil

What you do with it -

Heat oil in a heavy bottom pan.
Add the mustard seeds. Once they splutter, add the saunf, red chillies and then the methi seeds, in that order.
Add the mango pieces with the turmeric and salt. Cover and cook for about 5-6 mins
Add the sugar, chilli powder and 2 tbsp water and then keep on a low flame for about 8-10 mins, till it thickens up
Allow it to cool completely and then store in a jar
Serve with hot parathas

Saturday, May 5, 2012

Fresh mango pickle / Kothle lonche

Life's been good since I've reached Bangalore. Being with my family and friends is always wonderful, and to add to it, the weather is at least 10 degrees lower than Ahmedabad !! It rained the day I reached and its been a nice pleasant weather ever since...

I've been visiting my favourite places to eat in Bangalore and in one of the places, where you get Mangalorean style food, I had this absolutely yummy fresh mango pickle. I even had a second serving of this pickle at lunch that day !

fresh mango pickle

This fresh pickle or kothle lonche, as its called in Konkani, is almost always on the traditional wedding lunch menu. These lunches, however simple or lavish, are traditionally served on a plantain/banana leaf. There is a particular direction in which the leaf should be placed and an order in which the various items are served. It starts with the salt then the pickle, and then the servers start with the stream of side dishes, rice, kheer, etc...
This pickle is made on the same day or perhaps a day before and served fresh. I remember eating this pickle like a side dish at most weddings.

It does not have oil and there are no preservatives, so it can't be stored for too long. Mango pickles generally have the skin on, but in this one, the skin is peeled so that it doesn't change the texture too much when you are eating this pickle.

My aunt has sent across a bunch of raw mangoes and Ma promptly made this pickle the next day.

mango pickle

Fresh Mango pickle

What you need -

2 raw mangoes
1" piece ginger
1-2 green chillies
1 tsp mustard seeds
15-20 methi seeds
a pinch of asafoetida / hing
10-15 red chillies (if using byadgi chillies, lesser if its a spicier variety)
juice of 1 lemon
1/4 tsp turmeric powder
1 tsp salt

1 clean and dry glass bottle with an air-tight lid

What you do with it -

Wash and peel the mangoes. Cut it into tiny pieces
Peel the ginger, wash and dry completely and chop finely
Wash and dry the green chillies and cut really fine
In a cleaned and dried glass bottle, add the turmeric powder, hing, salt, mango pieces, ginger and green chillies
Grind the mustard, methi and red chillies to a smooth paste, adding as little as required
Add this ground masala along with the lemon juice to the mangoes in the bottle
Mix well with a dry spoon and close the bottle with an air tight lid
This pickle should be stored in the refrigerator and used within 3 weeks, since it is a fresh pickle and has no preservatives or oil

Wednesday, March 14, 2012

Pedatha's Ginger Chutney / Allam Pachchadi

When I was visiting my cousin in the US a couple of years back, she had jars of pickles and pachchadis made by her mother-in-law, stacked up in her refrigerator. Her husband's family is originally from Andhra and the pickles and chutneys were absolutely lip-smacking

ginger chutney

This particular allam pachchadi / ginger chutney was at the breakfast table every morning. We had it with dosas regularly and one Sunday, her husband made these amazing pesarattus for breakfast. That and the allam pachchadi, for me, was a match made in heaven ! After I got back, I have been craving that ginger chutney, especially when I made pesarattu

Finally got down to making this from Pedatha's book. Absolutely delicious if you love the flavour of ginger as much as I do !

Ginger Chutney / Allam Pachchadi
Recipe Source : The vegetarian cookbook of traditional recipes "Cooking at home with Pedatha"
by Jigyasa Giri and Pratibha Jain

What you need -

1 cup peeled and grated ginger
3 tbsp tamarind pulp
1 tbsp jaggery
2 tbsp ghee
2 tbsp oil
salt to taste

1st tempering
1.5 tbsp split black gram / urad dal
1 tbsp mustard seeds
3-4 red chillies
1/2 cup curry leaves
1 cup coriander leaves (optional)
1 tsp asafoetida / hing
1/2 tsp turmeric powder

2nd tempering
1/2 tsp split black gram / urad dal
1/2 tsp mustard seeds

What you do with it -

In a wok / kadai, heat the ghee and fry the grated ginger well for 4-5 mins. The ginger should turn light red in colour
Do not over cook, the ginger needs to retain some of its juice. Set aside
In another wok / kadai, heat 1.5 tbsp oil for the first tempering. Add the urad dal and as it turns golden, pop the mustard seeds
Turn off the flame and add the red chillies. As they turn bright red, add the rest of the ingredients under 1st tempering and stir
grind this along with the tamarind pulp, jaggery and salt to a coarse paste
Add the cooked ginger and grind coarsely. Do not add any water while grinding
Heat the remaining oil for the 2nd tempering
Add the gram, as it turns golden, pop the mustard and switch off the flame
Garnish the chutney with this tempering
Serve with idlis, dosas, rice or my favourite, pesarattu!

Pedatha's tip: Avoid the coriander leaves if you want to preserve this chutney for a longer time

Thursday, October 13, 2011

Mirchi / Spice Roasted Green Chillies

I was invited to my friends place for lunch. Her mother-in-law was visiting and she had called us over to taste some authentic UP (Uttar Pradesh) style food.
There were green puris (the inspiration behind these rotis), dahiwale aloo(potatoes in a yoghurt gravy), turai (ridge gourd with spices in a peanut paste) and some awesome mirchis/roasted green chillies...

spiced up green chillies

Though I can't eat food thats very spicy, these chillies were finger licking good, the spice of the chillies had mellowed down quite a bit with the besan and other spices. TH enjoys spicy food, so made this the very next week...Goes great with rice and dal or rotis or just as it is !

Spice Roasted green chillies
Recipe Source : Mrs Shukla

What you need -

3-4 tbsp mustard oil
1 tsp mustard seeds (use a combination of the yellow and black, if you have both)
1/4 tsp hing / asafoetida powder
1.5 tsp saunf / fennel seeds
1/2 tsp turmeric powder
1 tsp dhania / coriander powder
1 tsp amchur / dry mango powder
4 tbsp besan / gram flour
20 fresh green chillies

What you do with it -

Roast the besan on a low flame for 3-4 mins and set aside
Take the stalks off the chillies, wash, wipe and slit them in two along the length and keep aside
In a pan, add the mustard oil and when it is really hot, add the mustard seeds
Once they splutter, add the saunf and hing
Add turmeric powder and dhania powder and stir
Add the slit chillies, salt and amchur and fry on a low flame. Add more mustard oil if the chillies start drying out
Add the besan. Don't add too much or it will completely mask the taste of the chillies
Fry this on a low flame for 3-4 mins
Allow it to cool. Can be kept outside for about 4 days or store in the fridge for about a month

Tuesday, October 11, 2011

Pedatha's Andhra Chutney Powder

A couple of weeks back, I chanced upon Pedatha.com, when I was following some links from some other sites. 'Cooking at home with Pedatha' has become a standard reference book specially for chutneys, ever since I was gifted this book by Miri

I got to know thru this, that she had passed away earlier this year, and though my association with her was just this book, I did feel a loss...

Andhra Chutney Powder

I regularly try recipes from this book, but the chutneys are my favourite...I knew I just had to make something as a tribute to this very wonderful and charming woman.
I had never tried any of her dry chutney powders, so decided on making this one, a famous Andhra spicy chutney powder...

Thank you Jigyasa and Pratibha for this wonderful book. May her soul rest in peace...

Andhra Podi Chutney

Recipe Source - The vegetarian cookbook of traditional recipes "Cooking at home with Pedatha" by Jigyasa Giri and Pratibha Jain

What you need -

4 tbsp oil
2 tsps ghee
salt to taste

To be roasted without oil
1 cup bengal gram dal / chana dal
1 cup split black gram husked / urad dal
1 tbsp poppy seeds / khus khus
3/4 cup grated dry coconut / kobri

To be roasted in oil
2 cup red chillies ( I used about 20 byadgi chillies)
1/2 cup cleaned and wiped curry leave
1/2 tsp asafoetida / hing
lemon sized ball of tamamrind

Tempering
1 tbsp Split black gram / urad dal
1 tsp mustard seeds
1/2 tsp asafoetida / hing

What you do with it -

On a low flame, dry roast the grams, each separately to a deep brown. I use a tava to do this, given a more even heat to the grams
Dry roast poppy seeds and dry coconut each to golden brown
Heat 3 tbsp oil and roast the chillies until crisp and bright red, but not brown Remove the chillies from oil and set aside
Roast the curry leaves in oil until crisp and dark green, set aside
Dry roast the asafoetida powder
Next, roast the tamarind, Press with a ladle so it roasts well and set aside
Grind all these ingredients with salt to a coarse powder
Heat the remaining oil for tempering. Add the urad dal, as it turns golden, pop the mustard and switch off the flame. Add the asafoetida and pour this tempering into the prepared powder and mix well
Pour in the warm ghee and mix well. Cool and store in an airtight jar

Thursday, September 2, 2010

Curry leaf chutney powder / Karabevu chutneypodi

This one is from Ma's recipes...
She would make this for me ever so often and drop a jar of it at my place, when I was in Bangalore
Now since I've moved, I've got the packet just once over the last two years, and its always over in less than two weeks.. This time, I decided to make it myself and got the recipe from her
I had never attempted making any of these chutney podis earlier, but after I tried making the molagapodi from Usha's blog, its become a monthly ritual. We are so hooked on to the taste of this molagapodi, that the store bought ones just don't cut it for us, anymore.
I'm pretty sure the karabevu chutneypodi is also going to be added to my list of to-dos every month...

chutneypodi

The flavour from the roasted curry leaves in this chutney powder really lingers in your mouth. Goes best with idlis and dosas.
I even had it with some toast and butter, thats something I first tasted at my aunt's place when I was little...tastes fabulous in this combinaton too !!

What you need

15-20 red chillies (depending on how spicy you want this)
2 cup packed curry leaves / kadipata / karabevu
1 cup pottu kadalai / roasted bengal gram / hurgadle bele
1/2 tsp amchur powder
1/2 tsp salt
1 tsp oil
pinch of asafoetida / hing
1 cup dessicated dry coconut / kopra / kobri
1/2 tsp sugar (optional)

What you do with it -

Wash the curry leaves, strain out the water and dry it in the sun or a covered cloth, till all the moisture is gone
In a large kadai / pan, heat the oil and add the asafoetida
Add the chillies and roast for 3-4 mins on a low flame
Add the dried curry leaves and the dessicated dry coconut
Roast for about 2-3 mins
Add the roasted gram and stir for a minute or two
Once this cools, grind it to a smooth powder, with the amchur powder and salt
If you are using the sugar, add it and run thru the blender one more time
Do not add any water while grinding
Tamarind can be used instead of amchur powder. Ma uses amchur powder, since it is a dry powder and so it can be stored easily. With tamarind, you will need to refrigerate it

Thursday, July 2, 2009

Plum Jam

There are loads of plums in the market here and my son had never tasted any, so bought a few to see if he'd like it..Till he was about 3, he never liked anything with a citric flavour, but now oranges and lemons have finally made an entry in his diet...
Surprisingly, he loved the plums, so I went and bought a whole load more and then he decided he didnt want to eat them any more...Now I was stuck with about 25 plums and a husband who does not believe in eating any fruit, unless they are juiced and a son who just didnt want to eat plums again...
I kept popping in plums everytime I walked by the kitchen till I got sick of it.

Bottled jam

I had never tried making jam at home - I always thought it was too complicated and messy...I didnt want these plums going waste, so finally looked up recipes for jam and I did it - made my first jam at home !!!

I kept tasting it as it was getting done and found it a bit sour. I didnt want to add any more sugar, so grated some ginger and squeezed the juice of it on the plums.
Then I added a few cloves too and it did add a lot to the flavour..

Plum jam and bread

It was super simple after all and turned out just great...The husband and son had it for breakfast today !!

What you need -

20 plums
1.5 cup sugar
1 cup water
1 tsp grated ginger
5 cloves

What you do with it -

Wash the plums well and wipe. Remove the stems if any
In a thick bottomed pan, add the plums, sugar and water
Keep it on a low flame. After about 10 mins, when the plums are all wilted and mushy, add the cloves and the juice of the grated ginger
Keep stirring every now and then
Check the consistency by dropping a bit on a plate. It shouldnt be runny and should look set
Remove the seeds once its almost done. The skin of the plums was soft and just melted into the flesh of the plums
Once done, allow to cool and store in jars
The jars need to be cleaned and dried completely in the sun or in a microwave

Wednesday, June 17, 2009

Surna Koot (Konkani style Yam pickle)

When I was visiting my mom in Bangalore, my aunt was visiting too.
She is a 'reuse' specialist and I dont mean that in a bad way at all...She makes quilts from left over bits of cloth, laddoos from whats remaining after she makes ghee at home, knits mobile holders from little strands of whats was used for some other dress...She is truly amazing in her art of reuse. Nothing, as in absolutely nothing goes waste in her hands...
This post is dedicated to my dear aunt...

Koot

From my list of requests, my aunt made this super duper surna koot. It spicy, tangy and goes with anything...this is the real finger licking good stuff !!
She also made an absolutely heavenly baked fish dish called 'hugga'. It was too good to resist and there was no time to photograph or write the recipe down.
It was just licked clean off the plates...She is visiting soon, so hopefully, I will get the recipe then.
She also made some canttola fritters, which will appear soon on this blog...

From her Konkani instructions, I had to write down this recipe and at times, it got so difficult to translate it, because we use some really cool words like 'khalkhali', 'charchari' which actually describes the sound of the yam when it is crisp enough - now, how was i supposed to get that across in English ?
This is what the fried yam looks like..You have to make do with the lack of 'sounds' here...

Fried Yam

What you need -

For the masala-
16 red chillies
2 tsps mustard seeds
1/4 tsp asafoetida
1/2 tsp fenugreek seeds
tamarind the size of a lemon
1 tsp oil
salt to taste

1/2 kg yam

What you do with it -

For the masala-
Heat oil in a kadai and add asafoetida till it simmers
Add red chillies, mustard seeds, fenugreek seeds and fry till the mustard seeds splutter
Grind the tamarind and red chillies first and then add the rest to it and grind to a fine paste. Add salt
This is the base masala and can be stored in the 'fridge.

Peel the yam and cut into really small pieces
Put these pieces in a colander and run it under water. Do not touch the yam with water - it can cause a real itch on your hands
Fry the yam pieces in oil - you can deep fry the pieces or fry with lesser oil on a small flame, till it gets really crisp

Mix the required amount of masala with the fried yam. This masala would be a little too much for 1/2 kg yam, so store the masala and use with fried potato, as a variation

Monday, May 18, 2009

Spicy Tangy Chillies !!

The first time I'd seen these chillies were at a food stall at one of the innumerable exhibitions held in these big grounds in Bangalore.
These chillies would be hanging all around the stall too and they would make these really yummy chilli fritters (molaga bajjis).


Rainy cold weather always reminds me of these bajjis and a hot cup of tea, though I may not have really made these more than 5 times in the last 10 years, but just thinking about it makes me feel nice and warm, especially when its pouring outside !!

These chillies are really quite mild in taste, not spicy like you'd expect a chilli to be. These are also known as Hungarian peppers.

This is what Ma made. She got the recipe from a friend of hers.
You can feel the mild spice of the chillies, the sweetness of jaggery and the tangy flavour of the tamarind burst in your mouth, with every bite of this.
It is simply delicious and is great with parathas or even a simple dal and rice. Its almost become a staple at lunch these last few days.


Do give it a try if you like something spicy, sweet and tangy, all in one bite !
Sending this to Mahima's 15 Minute cooking...

What you need -

6 Green chillies / Hungarian peppers
2 tbsp grated jaggery
2 tsps fennel (saunf) seeds
1 tsp cumin (jeera) seeds
1/2 tsp fenugreek (methi) seeds
1/2 cup tamarind extract
1 tsp oil
1/2 tsp salt
1/2 cup water

What you do with it -

Quarter the chillies lengthwise and deseed. Wash and keep aside
Heat oil in a deep pan
Add the fennel, cumin and fenugreek seeds
Add the chillies and fry a bit
Add the tamarind extract, jaggery, salt and water and bring to a slow boil
Once it cools, store in a jar and refrigerate

Tuesday, April 21, 2009

Spicy chutney with a suprise ingredient !

Asha and Suparna requested for the chutney recipe from the previous post. Told my mom and she decided to make it again, so that I can get a better pic of it.
So, here is your chutney, staright from Ma's kitchen !

I assumed it was pretty much the standard chutney ingredients, but guess what - this one has a carrot in it - it adds to the nice orangey colour and of course, tastes wonderful...

These days my little one is big time into 'Suprise ...ta daa' when he makes something with his blocks, he hides it behind his back and then comes to the kitchen (where i generally live) and goes "mamma, surprise...ta daa' and shows me what he's made...so i couldn't resist adding the 'suprise...' ingredient up there in the title :)


What you need

4 tbsp grated coconut
1 tbsp coriander seeds
1 tsp cumin seeds
1/2 carrot chopped into little pieces
3-4 red chillies
small ball of tamarind
1/2 tsp salt

Grind all the ingredients to a smooth paste and your chutney is ready

LinkWithin

Related Posts Widget for Blogs by LinkWithin