Showing posts with label WKTB. Show all posts

Tuesday, August 26, 2014

Cottage cheese and mint stuffed bread

Its time for this month's bread for WKTB. Aparna was busy with organizing the fabulous Foodbloggers meet in Bangalore and I was miserable that I couldn't attend it. Have been reading about all the fun and learning that happened at the meet and can't help feeling sorry for myself for being so far away.

side800

This month, since she was all tied up, she asked us to bake a decorative bread, filled with something savoury. I really love baking bread and its so much simpler than it seems, but never thought about making a decorative one. The most creative experiment with bread was my braided bread and I wanted to try something new this time.

stuffed bread8

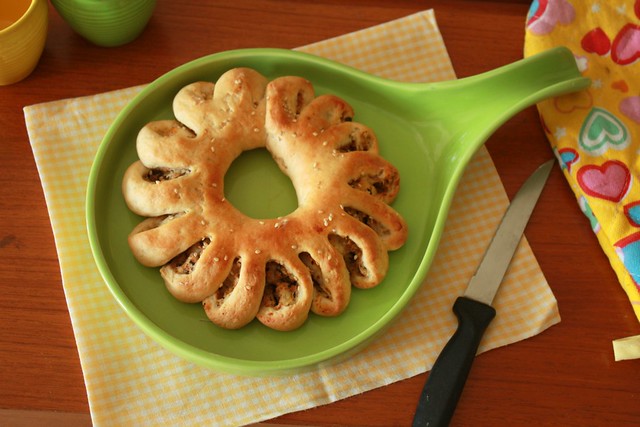
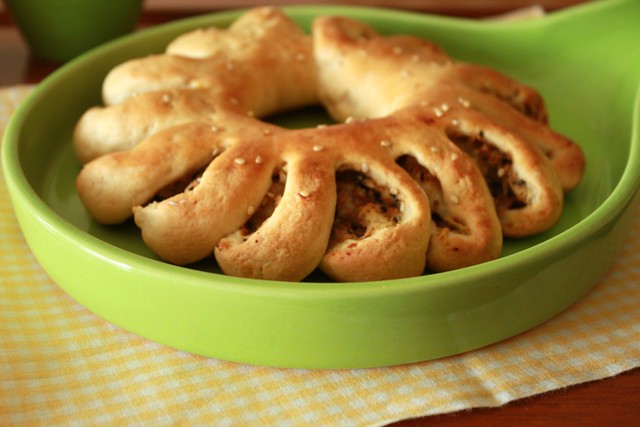
Inspired by this flower shaped bread here, I decided to make that. As usual, I was running late and though I was contemplating 20 different ideas for the savoury filling, I decided on this one with paneer and mint. It has lovely Indian flavours and the bread turned out quite pretty. I thought it looked like a flower, but my son insisted it looked like the sun !

coll5

It was quite a task to use the camera while shaping the bread. I used my phone and the pics aren't too great, but I hope it gives you an idea of how to make it

This bread is sent to Susan's Yeastspotting page.

Decorative stuffed bread
Adapted from ChefinDisguise

What you need -

2.5 cups maida / APF
1/2 cup wheat flour
3/4 cup warm milk
1/4 cup warm water
2 tsp instant yeast
4 tsp sugar
1/2 tsp salt
3 tbsp butter
For the filling -
1/2 cup cottage cheese / paneer
1/4 cup packed mint leaves
4 tbsp shredded cheese
1/2 tsp chilli powder
1/2 tsp cumin powder
a pinch of salt

What you do with it -

In a bowl, add the warm milk, warm water, butter, sugar and yeast and stir gently
In a large bowl, add the flours and salt
Make a well in the flour and pour in the yeast mixture
Knead for about 6-8 mins till a smooth elastic dough is formed
Place in a greased bowl and cover with cling wrap
Keep it in a warm place for about one and half hours or till it doubles in size
Meanwhile, crumble the cottage cheese and add the grated cheese to it
Chop the mint leaves really fine and add to the cheese
Add the spice powders and salt
Combine and set aside
Once the dough has risen, punch it down and divide it into two balls
Dust the surface with flour and roll out the ball of dough into a rectangle. Use a pizza cutter to cut the sides and get a rectangle shape
Place the filling on the rolled dough leaving about half an inch on each side
Start form the longer end and roll the dough to get a long pipe shape with the filling tucked inside
Turn the two ends towards each other and pinch the ends together to form a circle
Make slits at every 2 cms, a little more than halfway to the centre
Turn each slit to the right
Place a few sesame seeds on top and brush the bread with milk. Cover with a thin cloth and allow it to rise again for 15 mins
Pre-heat the oven to 200 C
Place the tray with the bread in the middle rack and bake for 25 mins
Brush with butter once its done.The stuffing has enough spice, but if you like, you could serve this with ketchup or a chutney

Monday, June 30, 2014

Komaj | Persian bread stuffed with dates

When I tried logging into my blogger account today, I actually needed a minute to remember my password. Either my memory is really failing me, or its been that long since I wrote a post. I know I enjoy cooking / baking and blogging, but some somehow the last couple of months, I just haven't been able to get myself to blog.

I am a part of this group called 'We knead to bake', started by Aparna of My Diverse Kitchen where we are given a new bread recipe every month. The fact that I might be out of that group if I skipped another month of baking made me finally get down to baking and posting. I'm glad there is some such rule, otherwise knowing me, I wouldn't get beyond the first month.

komaj5

This month's recipe was Komaj, a Persian bread stuffed with dates. It involves 3 rises of the dough and sounded like a lot of work, but its actually quite simple. The stuffing is a lovely combination of dates, butter and cardamom. The dough also has a lot of Indian spices like turmeric and cumin. I was a bit skeptical about the combination of these very different flavours, but my love for dates made me try this and I'm glad I did !

openkomaj5

Have it as soon as you bake it and its wonderfully soft and delicious. The dates used are the dehydrated ones, but once baked, they almost melt in your mouth

Thanks Aparna for introducing us to this lovely bread. This bread is being Yeastspotted !

Komaj | Persian bread stuffed with dates

What you need -

Dough -
1 tsp instant yeast
1/8 cup warm water
3 3/4 cups APF / maida
2 1/2 tsp toasted and crushed cumin seeds
1/4 cup granulated sugar
1/2 tsp turmeric powder
1/2 tsp salt
1 egg (optional)
2/3 cups warm milk + 2 tbsp
1 1/2 tbsp olive oil

Filling -
12 seedless dried dates, chopped
1 tbsp butter, softened
1/2 tsp powdered cardamom
1 - 2 tbsp milk for brushing the dough

What you do with it -

If you use active dried yeast, dissolve the yeast in the warm water and keep it aside for 10 minutes till it froths up a little
I used instant yeast, so skipped this step and added it straight to the flour
Put the flour, 2 tsp of the crushed cumin, sugar, turmeric and salt in the bowl of your food processor and run a couple of times to mix. Then add the yeast, water and the egg and run the processor again, till it is incorporated.
Now add the milk and olive oil, and knead until you have a smooth and pliable dough that’s not sticky. I kneaded a little more milk that mentioned in her recipe. So added 2 tbsp of milk.
Shape the dough into a ball and place in a well-oiled bowl, turn to coat the dough and then cover with a damp cloth and let it rise till it has doubled (took me about 45 mins)
When the dough has risen, deflate it and then shape into a round. Put it back in the bowl for a second rise till it has doubled (another 45 mins).
Prepare the filling by mixing together the chopped dates, soft butter and cardamom together in a bowl.
Divide the dough in to 4 equal portions, and divide each in half so you have 8 portions. Working with one portion at a time, roll each one out into a rectangle that is about between 1/4" thick. I used a cookie cutter with a flower shaped edge that made the komaj look like a little tart !
Press it down lightly to make an impression on one half of the rectangle and add a tsp of the filling there

Brush with a little water over the dough and then fold over to encase the filling completely. Use the same cookie cutter and cut the dough. Press at the edges so the filling doesn't pop out during baking

Repeat with the remaining portions of dough. I got about 14 komaj since my cookie cutter was a little small.
Place these buns on a lightly greased baking tray leaving space between them because they will puff up on baking. Let them sit for about 15 minutes.
Pre-heat the oven to 200 C. Then brush them with a little milk / egg wash and sprinkle the remaining ½ tsp of crushed cumin on top, pressing it down a little with your fingers
Bake the Komaj at 200C (400F) for about 8 to 10 minutes
Allow them to cool slightly and serve with a cup of tea !

Tuesday, February 25, 2014

Pita bread

Bread baking was something I never imagined myself doing. It seemed like such a big task, with the proofing, kneading, rising, baking, browning...But after I baked my first ever bread, a pretty fail-proof focaccia, I was hooked to it. The most satisfying part is that the wonderful aroma of fresh bread that spreads all over the house. I've heard that kneading the dough can be therapeutic, but with the daily roti-dough kneading which is more a chore that I'd happily have someone else to do for me, this bit did seem a bit over-rated !

pita

I've always wanted to bake my own pita bread and it seemed like the simplest of things to bake, considering it was very much like an Indian flat bread / roti that I am used to making on a daily basis. The first time I made it, it didn't fluff up at all and it was really disappointing. I guess I had missed out on the temperature settings, which are really crucial here since the bake time is not more than 5 minutes. So I gave this a try this time around, baking it for Aparna's We Knead to Bake #14, where we could choose to bake anything we liked.

pita with hummus8

My son is over eager when the camera is out and insists on clicking pictures himself or arranging the setting. He was rushing around acting really busy with the camera dangling on his neck and looking for 'props'. I didn't want to spoil the fun for him, but I really had my heart in mouth, wondering just when that camera would crash into something. the only way I could get the camera back was by telling him that I needed to take a picture of him with the pita bread. Phew ! So here's a pic with him (and his big hands) holding the pita pockets

pockets

Serve the warm pitas with hummus or fill the pita pockets with falafels and some salad. Recipe for hummus coming up next

This is being YeastSpotted

Pita Bread
Recipe Source - The Kitchn

Makes 6-8 small pitas

What You Need

1/2 cup warm water (not too hot to the touch)
1 tsp instant yeast
1/2 tsp sugar
1.5 cups maida / APF
1/2 tsp salt
1-2 teaspoons olive oil

What you do with it-

In a bowl, add the flour, sugar and yeast. Slowly pour in the warm water into this and stir
Add the salt and oil and start kneading it. I prefer working with the dough on a clean counter-top
Add a little flour if it gets too sticky and knead till it forms a smooth dough
Place this in a well-oiled large bowl and allow it to rise for an hour or so, till it doubles in size
Once its rise, punch it down and then divide into 8 small balls
(At this point, the dough can be refrigerated in a cling wrap if its not going to be used rightaway)
Using a rolling pin and a little flour, flatten the ball to form a small round (about 3" dia and 1/2" thick)
Pre heat the oven along with the baking tray to 220 C or 450 F
Place the rolled-out pitas directly on the baking tray / baking sheet and bake for about 3 minutes
The pita will start to puff up after a minute or two
You can also bake them on the stove top using a skillet. You will need to flip over the pita and cook on both sides if using the stove-top method
Keep the baked pita covered in a clean cloth
Serve immediately to really enjoy the fresh and fluffy pita
Serve with some hummus or use the pita pockets and stuff with falafels and some salad

Friday, January 24, 2014

Focaccia Caprese | We Knead to Bake #13

I joined this group called 'We Knead to Bake' started by Aparna of the lovely blog, My Diverse Kitchen. I had to wait almost an entire year to get into this group, so this is really the first one I am baking with them, but their 13th.
It always fun to bake in a group, even if the group is a virtual one ! Its inspiring and you feel good about being in the company of some fantastic bakers and more importantly, people who like baking.

focaccia caprese

Aparna gives us a recipe each month and this time its Focaccia Caprese. This needed Mozzarella and fresh tomatoes. Here in Ahmedabad, the dairy products are really good, not surprising considering Amul is about an hour away from here! There is this other place called 'Jain Dairy', which has amazing dairy products. I got the mozzarella from there and it was fantastic !
Bread baking can be simpler than the regular Indian cooking, once you get the hang of the yeast beast. Thankfully, I've had a pretty good working relation with the yeast and so we get along just fine. What's made life easier is that I discovered instant yeast, thanks to Sayantani and Suma. Its a dream to work with, no worries about the proofing, just a fairly sunny day and you're set ! I've even tried it on a gloomy rainy day and it still worked fine.

This focaccia has this really aromatic herbed oil which gives it a great flavour, along with mozzarella and fresh tomatoes. Its a great recipe and it you are yet to begin baking with yeast, this is a great start. Focaccia is the easiest of breads and tastes great.
I baked mine for a minute or two more to allow the cheese to melt a little more. The one with the slightly melted cheese got chomped in minutes and I had no time to click the pictures. This one was made to my son's taste, who didn't want to see so much cheese!

focaccia800

This is being Yeastspotted !

Focaccia Caprese

Recipe Source : Aparna of My Diverse Kitchen, adapted from The Kitchen Whisperer

What you need -

For the dough :

2 tsp instant yeast
1.5 tbsp sugar
3.5 cups maida (I did not have vital gluten, used plain flour)
1 tsp salt
1/4 cup olive oil
1 to 1 1/2 cups warm water
A little more olive oil for brushing dough

For the Topping:

4 large tomatoes sliced
1 small round of fresh mozzarella
a few fresh basil leaves

For the Herbed Oil:

1/4 cup olive oil
1 tsp dried oregano
1 tsp dried basil
1/2 tsp red chilli flakes
1 tsp finely minced garlic/ paste
Salt to taste

Fresh basil leaves for garnishing

What you do with it -

To make the herbed oil, add all the ingredients listed under herbed oil and whisk well. Set it aside.

In a large bowl, add the yeast, sugar, flour, salt and oil. Combine and add 1 cup of warm water and knead until you have a soft elastic dough. I knead it on my kitchen platform (thats been scrubbed clean). Its much easier this way for me.

Grease a bowl with a little olive oil and place the dough in it. I tend to apply a little oil over the top of the dough too. Then cover the top of the bowl with a cling wrap. From my experience with breads so far, this works better than covering it with a thin cloth. Allow it to rise in a warm place. This could take between 40 mins to an hour

Once the dough has risen, divide it into 2,3 or 4 parts, depending on what size you want. If you are not using it all, wrap the unused dough in cling film and refrigerate it. Bring it to room temperature and then proceed. I used this dough to make 3 medium sized focaccia. I made 2 first, refrigerated the remaining dough, after the first rise and made the next one a day later. It turned out just as good.

Pre-heat the oven at 200-210 C

Roll out the dough or just use your hands to stretch it to the shape you want, it really doesn't matter. I prefer rectangle or oval. Place the dough in a greased baking tray. Allow it to rise for about 20 mins. the dough gets pretty springy at this stage. Oil your fingers slightly and then make little 'dimples' in the dough, that are fairly well-spaced. Grease the top of the dough with oil

Bake for about 15-20 mins till the sides are golden brown. Take it out of the oven and raise the temp of the oven to about 230 C

Using a spoon, pour the herbed oil over the focaccia and then place slices of mozzarella over it. Top the mozzarella with tomato slices. Bake for another 5-10 mins, till the cheese has melted. Remove from the oven and top with fresh basil leaves
We had this with minestrone soup for dinner and again for breakfast the next day, freshly baked, of course!

LinkWithin

Related Posts Widget for Blogs by LinkWithin